A checklist lead magnet is just a series of actionable tasks that can help the reader to accomplish a specific goal. In this video I'll show you how to make your own.
In this video I show you how to make your own.
Video Transcript
Checklists are always one of the most popular lead magnets with any audience. In this video, I'll show you how you can create your own. Let's do it.
You probably already know what a Checklist is, but just to be sure, it's essentially a series of actionable tasks that people can use to achieve a specific goal. Checklists help to make large, complicated tasks seem easier and more achievable, and they also give people an obvious way to take action. So, it's great for helping people get started.
In this sample Checklist, it provides people with a series of tasks that they can carry out in assessing a used car. An insurance company might offer this lead magnet to people who are in the market for a used car. It consists of a Cover page, a short introduction, two pages of practical tasks to be completed, and a Call to Action at the end. You can find the link to this Checklist in the description below the video.
Making A Checklist Lead Magnet In Beacon
So, now we know what a Checklist is. Let's go ahead and recreate this example in Beacon. As always, we're going to start this project on the Beacon dashboard. We're going to go to the yellow button and select Create New Lead Magnet.
The format that we're going to be creating today is, obviously, a Checklist. So, we'll select that. We're not going to import any content. And when it comes to choosing a theme, we're going to look for one that is slightly close to our purposes. The Checklist that we're making is all about used cars. It's about helping to do some checks on a used car before they purchase it. I can't really see any templates here that are related to cars, so we're going to find one that's kind of close to what we need and just customize it to suit our purposes.
For example, this template has a big background image. It's got this like orange banner that makes the text in it very readable. So, let's just pick this one, and we'll customize it to suit our needs.
We'll just give this lead magnet a title so we can find it later. Used Car Checklist. As always, Beacon sort of pulls the document together. You can see on the left-hand side that we've got four different pages within this document, and if we use the arrows up here in the top right-hand corner, we can see all the pages included in the lead magnet.
Customizing Your Checklist Lead Magnet Template
So, we've got the Cover page, got a short introduction, got the actual checklist items, and then we've got a Call to Action at the end. Now the problem with this particular lead magnet is that it's got nothing to do with cars. It's got like generic, business type images throughout it. So, we're going to go through each of these pages and customize them to suit our target audience, which is, people shopping for cars.
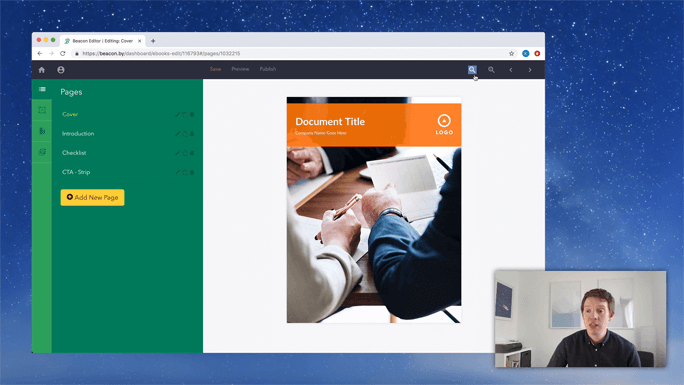
So, let's go back to the Cover page and make a start. The biggest way that you can make an impactful change to the design of your lead magnet is to change the cover page image. It's really easy to do. You go to the cover page, and then you go to the third option on the left-hand side, which is Page Settings. You click that. You can see that this thumbnail has the existing cover image in it. If we click that, we can change it. I'm going to click it and upload a new image. I have that saved on my computer, so I'm just going to double click that. Already we can see that this document is looking a little bit more like it has something to do with cars. We're not finished yet, but it's a good start.
Next, I want to customize the text. The document title is no good. Let's replace that with our own document title. It's called "8 Essential Checks to Make Before Buying a Used Car." So, you can see that we've added the headline to the cover page. But it's all squashed over to this one side, and there's a lot of empty space here. So, really, we want that title to just expand the full width of the page. One way I can do that is… So, see when I hover over these elements, you can see that this blue dotted line appears. It's because there's a column here within this strip. And this column contains the logo. And this column on the other side, on the left-hand side, contains the text.
For our purposes, we don't really need to have the logo here. We're going to put it towards the bottom of the page. So, let's just delete this column. We do that by clicking on the column and going over to the blue menu, and then clicking the Delete button. You can see now that our text sort of goes the full width of the page, and we have room to put a company name below the title. But I like to use that for a little bit of qualifying information just to make the checklist a bit more enticing. So, I'm going to just add in "Don't Buy a Used Car Without this Checklist."
So, basically, when people see the cover page of this Checklist, I want them to think, "That's something that I need to download." And, so, the image and the text that you use on the cover page are really important. Let me zoom out and see how that's all looking. So, it's looking pretty good. This text is a little small, the qualifying text. So, let's just click on that and use the blue menu just to bump that up a little bit to, say, 25. It's starting to look pretty good now. I'm going to close this blue menu and Save our changes.
Next, I want to add our logo to the page. We can put this pretty much anywhere, but I think for this image, you can see there's sort of a nice gap down here at the corner which seems like it's tailor made for a logo. So, let's add one to the page.
We're going to go across to the Drag and Drop menu, which is the second item on the left-hand side. We're going to drag an image onto the page. As you can see, this is the image placeholder. It's just where we dragged it onto the page. But let's change that to be our logo. So, we're going to click the placeholder, use the blue menu to change the image, and we're going to upload our logo from our computer.
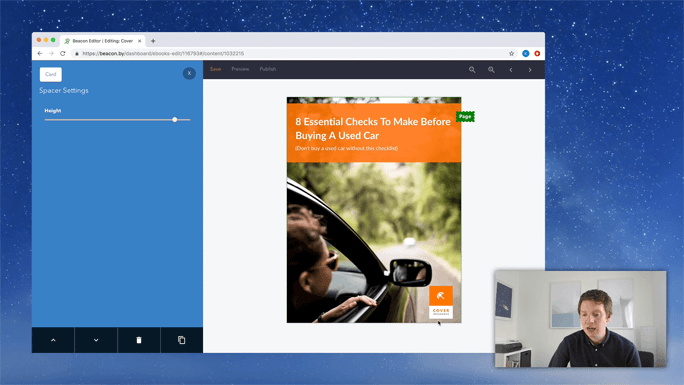
That's a big logo. That's far too big. So, let's use the blue menu just to reduce the size of that logo down to this. And we want it to be on the right-hand side of the screen. So, let's just change the alignment to Right. I'm going to close the blue menu. We want this image, this logo, to be at the bottom of the page in this corner. So, what I like to do in this situation is just to use a spacer and just drag it onto the page and put it in between the strip and the image. Release. And when you roll over a spacer, you have this striped blue area. So, when you click on that, you can increase the height of the spacer. And, basically, that serves to just push everything down, or pull everything up the page, so the height of the spacer means that you can push and pull content up and down the page. So, it's a nice little trick.
You can see that I'm trying to put the image right to the bottom of the page. But if I keep increasing this spacer, it's still leaving this little gap at the bottom of the page. That's because the page itself has some page margins set on it. So, let's just take off that bottom page margin. I'm going to close the blue menu. I'm going to go into Page Settings. And at the bottom of this menu in the margin section, I'm going to set the bottom margin to zero. As you can see now, there's no margin at the bottom of the page, so our logo can sit right at the bottom of the page. And that's looking pretty good. In just a couple minutes, we've gone from a generic sort of business-y template to one that's definitely branded for our company. It's got our logo. It's got our color scheme. And we've got a nice striking background image that's likely to appeal to our target reader for this lead magnet. So, that's the cover page. Let's move on to the next page which is the Introduction.
Customizing The Introduction Page
I may have said this in previous videos, but I think that every lead magnet should have an introduction section in it. So, the introduction really is your chance to convince the reader that the content included in the lead magnet is high quality content, that it's worth their time reading it, and that you're an expert in your industry, so they should trust your content. So, it's a lot of responsibility for you to get this across on just one page. I think an introduction is a great way to set the scene, add a little bit of context to the lead magnet, and really to show your expertise. So, let's add some content here. Okay, so, that is the introduction for our Checklist lead magnet.
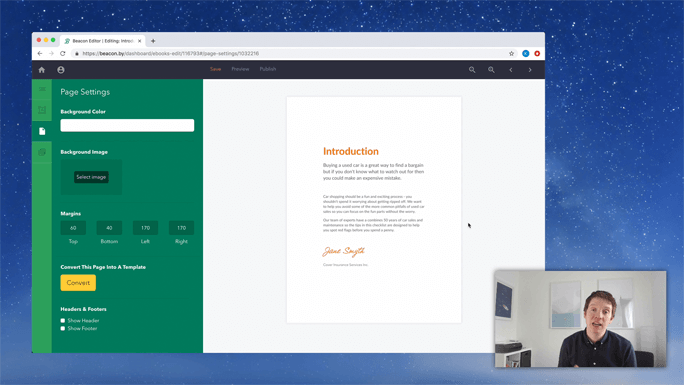
If you click this link, you'll be able to see this completed lead magnet. If you read the introduction, you'll see that this Checklist has been made by an insurance company, and they're trying to reassure readers that they know what they're talking about. They've been in business for 50 years, they know cars, they know what to look out for in buying a used car. So, they're setting the scene. They're establishing their expertise, and they're helping the reader to trust them. So, that's the introduction pretty much done. Let's move onto the next page.
Adding Checklist Items
This is probably the most important page in the Checklist. This is going to contain the actual checklist items. These are the eight steps people should perform when buying a used car. There's quite a lot of information for us to get across. I'm just looking at this page and I'm not sure it's the right format for us. If you look at this box, it has a list of like 10 checklist items, and this particular format would be good if we had nice, short checklist items. Fair enough, we've only got eight of them. But for each checklist item, I want to have a little bit more information about what checks to perform. Like, it's no good just saying, "You should check the tires." I want to have more information, saying, like, "How do you check the tires?" So, this format doesn't really work for us completely. So, I'm going to make a few adjustments. And they're really easy to do. Hopefully, that will help to show you how you can make similar adjustments when you're creating your own Checklist lead magnets.
The first thing I'm going to do is, I'm going to delete this headline. We've got a Cover page that has the title of the Checklist. So, let's just click on that. Use the blue menu to delete it. And the same thing with this small paragraph. We have a dedicated Introduction page. I don't think we really need to repeat ourselves here. So, we're going to click on it. We're going to use the blue menu, and we're going to delete it. That leaves us with this list of 10 checklist items. I'm going to delete the last 9. That leaves us with just one. And, then, I'm going to rename this checklist item to something like Tires. Let me zoom in so you can see that a little bit better. As I said before, it's no good just saying to people that you should check tires on a used car before you buy it. We need to tell them what to do.
Let's close this blue menu, and we're going to go to the Drag and Drop menu which is the second option on the left-hand side. We're going to drag in some more text. I'm just going to drop this in the box beneath Tires, and we're going to use this paragraph to explain what people should be doing. Before we add the text, let's just change it to a white color. We want to click the text, use the blue menu to change the text color to white, and now I'm going to actually go ahead and edit this text. That's our first checklist item. It's Tires. We have a statement explaining how people should check the tires. But it's still not quite right.
I'd like to make this have more of a headline, so I want to make the actual Tyres, the checklist item, a little bigger. So, when I click on it, I can see from the blue menu that this is currently 18-pixel font size. I'm going to bump that up to 30. That's a little bit bigger so that when people are glancing down the checklist, they can get the main items, so they can remember in their head, like, "I need to check the tires." "I need to check the windshield." Things like that. So, this is starting to look pretty good.
The one thing I would say is, that the actual box itself is a little bit narrow and we've got a lot of wasted space at either side. So, let's make this orange box a little bit bigger. The way to do that is to reduce the page margins. We're going to go into the Page Settings which is, again, the third option down on the left-hand side. We're going to go down to Margins, and we're going to reduce the left and right margins to 100 each. You can see now that the box is a little bigger, the text is a little more readable. So, we're looking good. Let me just click Save.
So, now we've got one checklist item, but we need another seven. I don't really want to have to do a lot of work because we're going to use the same format for each one. I'm just going to duplicate this box that I've already got. I'm going to click on the box, and in the blue menu, I'm going to the bottom and click Duplicate. Again, I'm going to click in the orange box. In the blue menu, I'm going to select Duplicate, scroll down, and try it one more time. Click in the orange box. Go down to the blue menu and select Duplicate. So, now, if I zoom out, you can see that we've got four good checklist items on the page. We don't really have room for another four to add. They're not going to all fit on this page, but we'll worry about that later. For now, I'm just going to make some quick customizations to the text on this page just to add the different checklist items.
The first one was Tires. The second one is going to be Glass. And the final one is Service History. So, if I close this blue menu, you can really see that this is starting to take shape. So, this is a good checklist with four items on it. Now, we have another four to do. They're not going to fit on this one page. So, what we're going to do is, we're going to duplicate this page and then just add in the text.

First, I'm going to Save my progress. I'm going to go to the Pages tab. I'm going to find the checklist page, which the page that we're currently on is yellow. So, if I go over to the side menu and click Duplicate, we now have an exact replica of our original page that's been added to the end of the document. I'm going to move that up so it's below the other items. I'm just going to Drag and Drop that duplicated page up below the original page. And, then, I can start making some changes to our duplicate.
So, the fifth checklist item is going to be Accessories. And the final option is Engine Screws. So, we can go through and sort of add the descriptive paragraph for each one. You get the idea. You can just go in and add those yourself. I'm going to close this blue menu and click Save. I'm just going to do a quick preview of this document to see where we're at. So, we're using the Preview link at the top menu. We can see that this is the Cover page. Got our title and nice big background image. We've got our logo at the bottom. We've got the Introduction which is looking good. And then we have our checklist items. So, that's 1, 2, 3, 4. And on the new page, we have 5, 6, 7, and 8. So, that's perfect.
Adding A Call-To-Action Page To Your Checklist Lead Magnet
The final page that we need to add now is the Call to Action page. This Call to Action page is just a bit generic, again. It's not really anything to do with the car industry. So, let's go back into the Beacon editor and customize this page. With the Pages tab open, I'm going to select the last page which is the Call to Action page. We have our logo already. I'm going to delete this logo, and I'm going to add ours to the top of the page instead. Again, I'm going to the Drag and Drop menu and clicking and dragging the image card onto the top of the page, releasing, and I'm going to click this placeholder. I'm going to use the blue menu to upload our own logo image. That's far too big, so let's reduce the size of that down. We want this to be centrally aligned. It's starting to look good, but the background image, it sets the tone for the whole page, and this background image just has nothing to do with cars. So, let's sort that out.
I'm going to go to Page Settings. You can see the thumbnail for the existing background image here. I'm going to select that, and I'm going to change it by uploading our own image. So, we have our logo at the top. We've got a nice background image of like an open road, so that's perfect for people who are shopping for a new car. They'll want to picture themselves driving a new car on the open road.
The placement of this strip is a bit awkward, and I think if we moved that to the bottom, we could see the horizon of the roads and would be a bit better. There's a spacer here just underneath our logo. I'm going to click on the spacer, and I'm going to use the blue menu just to push that orange strip all the way to the bottom. Again, you can see that I can't quite get that to the bottom, and that's because there are page margins there. So, I'm going to close the blue menu, go into Page Settings, go down to Margins, and then I'm going to reduce the bottom page margin to zero. That gets you to the bottom. And now that we're here, it would look better if our logo was sitting right at the top of the page. So, let's reduce the top page margin to zero, as well. Perfect.
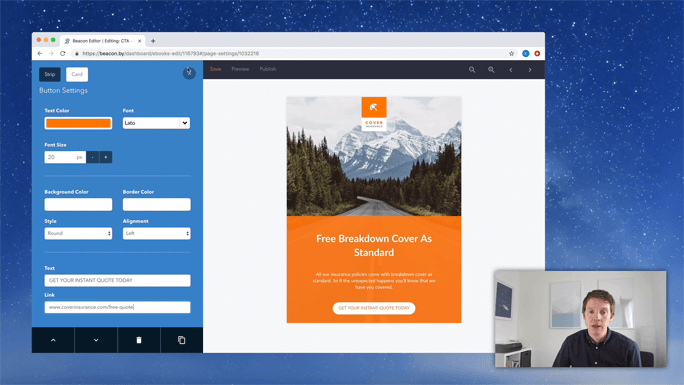
I mentioned previously in the video that this Checklist was going to be produced by a car insurance company. And the car insurance company wanted to put together this piece of content specifically for used car shoppers because they know that people who buy used cars are more likely to buy insurance products that come bundled with and say, "Free Breakdown Cover." So, that's what we're going to make the Call to Action for this lead magnet. We're going to say, like, "Now that we've given you this great information for how people can check a used car before they buy it, here's some insurance that completely covers your needs." So, that's what we're going to use the Call to Action to promote. I'm going to change the text now.
You can see now from this page that we're doing a good job of explaining what the offer is, like what we're offering people, which is, insurance with breakdown cover as standard. But now we need to lead people to where they can purchase or where they can get a quote for their insurance, and we'll do that with the button. So, we're going to click the button. We're going to use the blue menu at the left-hand side to customize the button text. So, I'll change that to, "Get Your Instant Quote Today." It's a more compelling Call to Action for the reader. And, then, all that's left to do is really to replace this dummy link with one to your own website. Like, coverinsurance.com/free quote.
So, that's it. I'm going to close the blue menu, click Save, and then if we go to Preview the Document, again, you can see that it's looking really great. We've got a brilliant cover page with a striking image and really clear text. We've got our own brand incorporated through the logo. We got an introduction that shows our expertise and helps the readers to trust us. We've got the essential items that people should carry out before they buy a new car. So, these are all checks with a little bit more of a description about how people can do it. This is valuable content that most people wouldn't know and understand, but you're using your expertise to teach it to them so they can apply it in their own situation.
And, then, finally, we've got this stunning Call to Action with an open road in the background. We're reassuring people that our company offers free breakdown cover as standard because we know that the people reading this Checklist are going to be more interested in buying used cars. So, they're going to be more interested in buying breakdown cover as part of their insurance package.
So, that's it. A Checklist is one of the most popular lead magnet formats out there because it's so practical. You're really helping your readers out, and they'll appreciate it because of that. Thanks, now.