A resource guide is basically just a collection of things that you recommend to help people achieve a certain result. It could be books, apps, equipment - absolutely anything as long as people can buy it.
In this video I show you how to make your own.
Video Transcript
Resource Guides are one of the easiest lead magnets you can create. So, in this video, I'll show you how you can make your own.
Before we get into the technical details, let's just remind ourselves what a Resource Guide is. Basically, it's a collection of things that you recommend to help people achieve a certain result. In this example, the Resource Guide recommends three different pieces of gym equipment that someone can buy to get fit at home.
A personal trainer could offer this lead magnet to people who want to get fit but might be intimidated by the gym setting. It consists of a Cover page, a short introduction, a page with some product recommendations, and a Call to Action at the end. You can find the link to this Resource Guide in the description below the video.
Creating a Resource Guide Lead Magnet
So now that we know what a Resource Guide is, let's go and recreate this example in Beacon. I'm logged into Beacon. I'm on the Beacon dashboard. And you see this big, yellow Create New button?
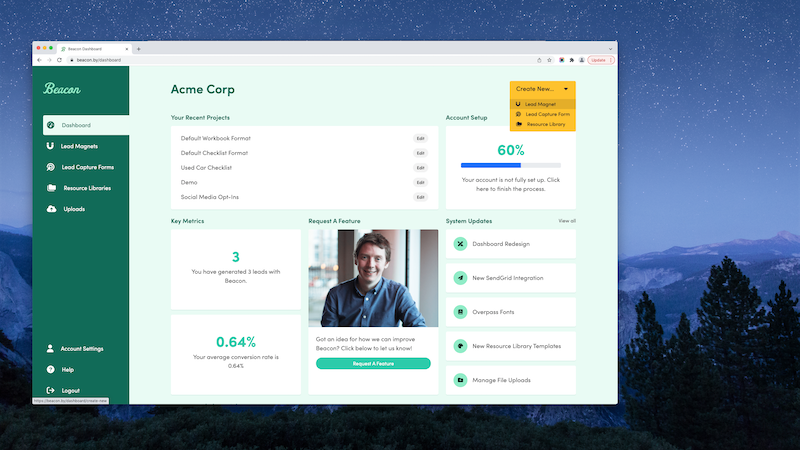
We're going to click that, and we're going to select Lead Magnet because we're creating a lead magnet.
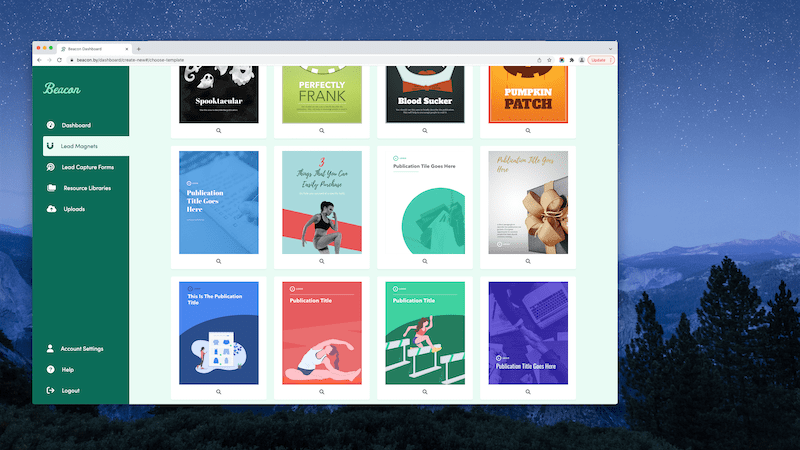
We'll then get a choice of all the different formats within Beacon. We're creating a Resource Guide right now, so let's choose that. We're not going to import any blog content for the moment, so let's just select No, and then we'll get a selection of all the different templates available to us within Beacon. So, this is essentially what your Resource Guide is going to look like.
You can scroll down to get a good look at them. There's a few dozen here. But what I like to do is, at the top, I like to filter by different industries. These are, for example, all the business-related templates. These are all the retail and e-commerce templates. But we're interested in health and fitness for this Resource Guide. So, if I filter by Health and Fitness, I get a selection of these four different templates. You can choose any of these. If you don't find one that sort of exactly suits the brand of your business, don't worry. All of these are completely customizable, so you can change colors, images, fonts. Just pick something that's relatively close to what you're looking for, and then you can customize it later.
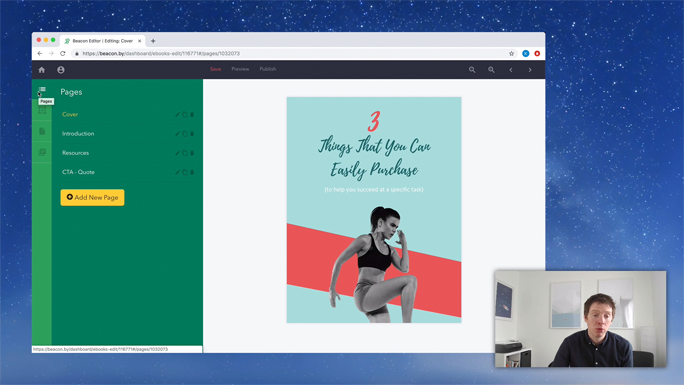
So, what we're going to do is, we're going to pick this nice, sort of blue-y pink one. Let's just click on that. Next, we'll be asked to give our lead magnet a title. This is for our own internal purposes just so we can find it later. I'm just going to quickly put in 3 Pieces of Equipment You Can Use to Get Fit, and then we're going to click to create the lead magnet.
Beacon sort of does all the hard work here. I'm going to zoom out so you can see that this is the cover image on the right-hand side. But on the left-hand side, underneath the Pages tab, which is open by default, you can see all the pages that are in this document. Here's the Cover page. This is the Introduction page. This is the page with the actual resources that we're going to be recommending to people. And this is a Call to Action at the end of the lead magnet.
Customizing the Lead Magnet Template
So, basically, all we have to do is go through and customize the content of each of these pages to suit our own purposes. If I zoom in here, you can see that this is a lot of just place holder dummy content. You couldn't publish this. It's got a fake logo, a fake paragraph here. So, we're going to go through this document page by page - there's only four pages - and customize it to suit our needs. So, let's get started.
I'm going to X out of this blue menu. I'm going to make sure the Pages tab is open. And I'm going to go back to the cover page. The cover page, the text on it at the minute, it says Three Things that You Can Easily Purchase to Help You Succeed at a Specific Task. It's dummy content. It doesn't make any sense, really. So, let's change that to suit our own purposes. I'm just going to click on the text that we want to change. I'm going to highlight it, and I'm going to delete it. Then I'm going to type in our own content. I think the Resource Guide was 3 Pieces of Equipment You Can Use to Get Fit.
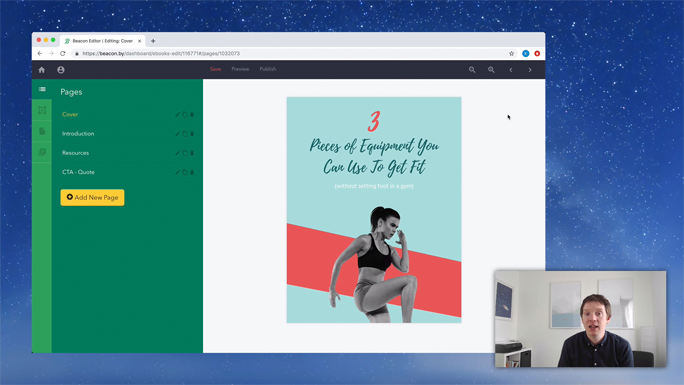
I'm going to centrally align that. To do that, I'm going to highlight the text. I'm going to go up to this Formatting menu that's hovering here, and I'm going to click Align Center. You can see it now. It says, 3 Pieces of Equipment You Can Use to Get Fit. See this white sentence underneath. This is like an alternative, so I always use this sort of like little bit in parentheses, just to explain what the alternative would be. So, in our case, it's 3 Pieces of Equipment You Can Use to Get Fit Without Setting Foot in the Gym. It helps to position your lead magnet as a better alternative to what the socially accepted norm is.
Normally, when people think, like, "Oh, I have to get fit," you think, "Oh, I have to go to the gym." But, we're saying, like, "You don't have to do that. This Resource Guide helps you to get around that convention." So, it's a good thing to put on your cover page just so people know. So, believe it or not, but that's more or less the cover page done. If I just zoom out, you can get a better look.
It now says 3 Pieces of Equipment You Can Use to Get Fit Without Setting Foot in the Gym. Now, you could customize this page more. You could customize it less. But, really, what we're trying to do is create a nice, quick, easy lead magnet. It doesn't have to be like this extraordinary thing. The content is what makes it extraordinary. But you could customize it more, for example, if you had, like, 12 pieces of equipment that you wanted to recommend.
You just click in the number 3, highlight it, and replace it with 12. But we're not going to do that. We're going to stick with 3. You see that it's left aligned. I can change that back to centrally aligned just by highlighting the text, going to the Formatting menu, and clicking Align Center. So, that's the cover page. I'm going to Save our progress there just so that we don't lose that, and I'm going to move on to the Introduction page. Let me zoom in so that you can read this text.
I always like to recommend that you include an Introduction page in pretty much every lead magnet that you create. So, whether it's a Resource Guide, a Checklist, an e-Book, it doesn't matter. And Introduction page helps you to frame the content of the lead magnet so it helps to give your readers a little bit a context, like, "Why did you make this lead magnet? Why is the content in this lead magnet important? Why should I trust you? What makes you an expert?" An introduction is a great way for you to get all the information across to your reader so that they're excited about the content that's in it. So, it's your opportunity, really, to get them onboard and trust you as an expert so that they then trust your content. So, let's do that.
I guess the phrase Introduction is a bit boring. Maybe I'm just going to change that to About This Guide. So, I'm just going to click in, highlight the text, and change it to About this Guide. I'm typing fast, so I've got typos. Let me just go back and fix that. About This Guide. So, you can see in the sample introduction, it says, "Congratulations. Someone downloaded your Resource Guide. This introduction is your chance to make sure that they actually read the book from cover to cover, blah, blah, blah."
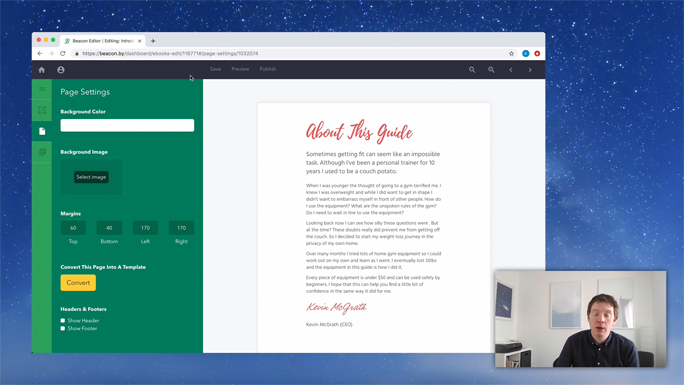
We want to actually do that, so, what I'm going to do is replace this text. The goal here is to give a little bit of context to the Resource Guide. I'm going to say, "Sometimes… I used to be a couch potato." So, do you see what I'm doing there? I'm empathizing with the reader. Like, I'm presuming that the people who are reading this Resource Guide want to get fit, but they're in a rut. They're stuck. So, I'm empathizing with the reader. I'm saying, "I get ya. Getting fit can seem like an impossible task. That's completely natural."
And, then, I'm sharing my own personal experience. I'm saying, "Ah, I'm a personal trainer. But for 10 years, I was a couch potato." So, I'm basically letting people know that I have experience. I went from where they are then to where they want to be. So, they're beginning to trust my experience. They're beginning to trust what I say in this lead magnet. So, let's move on and expand on that a little further.
I'm just going to highlight this text, delete it, and start typing here. So, that's the Introduction page, the main content of the Introduction page. It's a fair bit of content there, but if you read through it, and you can click here to see this Resource Guide in full, but if you read through the content on this Introduction page, it's really about establishing your credentials, getting the trust of the reader, and really showing your experience and expertise. So, that's your three goals, really, of an Introduction page for any lead magnet.
So, all you have to do at the end, then, is to sign it with your name. The font is already selected to look like a little bit of a signature. So, just replace that text with your own name. It's all done for you.
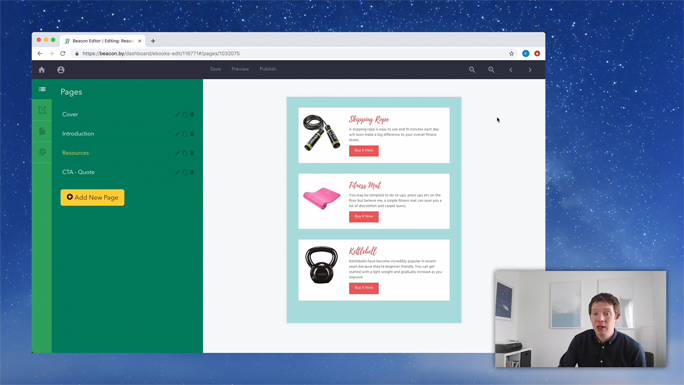
So, that's the Introduction page. It's less about the design and more about your own content. So, let's Save our changes. We're going to close this blue menu. And, then, we're going to go back to the Pages tab, and we're going to go to the next page. That's the Resources page. This is, obviously, the most important page within a Resource Guide. It's the actual items that you're going to be recommending that people buy. So, you can see from this page if I zoom out, there's three items.
So, we've got Item 1, Item 2, and Item 3. They all follow the same format. There's an image on the left-hand side. There's the item title and description. And, then, a button that obviously links to where people can physically buy this item. So, let's just zoom in, and I'll show you how we do one of these. It's dead simple.
So, we zoom in. The first thing we're going to do is, we're going to swap out this image so it's just the place holder image. We're going to click Image. When this blue menu appears, we're going to select this button here that says Change Image. We have an option then to upload our image from a saved place on our computer. I'm going to do that. We'll start with and upload an image of this skipping rope. Already, you can see this is starting to take shape. So, a nice, big bold image on the left-hand side.
We're going to change this headline to the actual title, Skipping Rope, and then we're going to put in a short description. People know what a skipping rope is, but this is your opportunity to say why they shouldn't discount it, why this is a vital piece of equipment. You're helping people to look past the obvious. And this is really, again, where you get your expertise and experience across. So, let's try that.
So, again, like I said, a skipping rope is fairly self-explanatory. But with this short description, what I've done is, I've reassured people that it's easy to use, you only need to do it for 10 minutes a day, and if you do that, it makes a big, overall difference. So, I know most of the people watching this video aren't going to be making a Resource Guide for fitness equipment, but what I want you to do is apply this to your own industry.
Think about, like, what are the easy things that you can recommend to potential customers that they can buy that can make a big difference in their life. And it's up to you to help them look past the obvious. They might not know why this app you're recommending is worthwhile. It's up to you to tell them. They might not be bothered reading a book, but if you can convince them why it's a good idea, like, it's up to you to convince people these resources are worthwhile.
So, we've got the image. We've got the headline. We've got a short description. And the button, that's what we're going to customize. The button's a little bit different. When you click on the button, you'll notice in the blue menu, you can change the button text on the left-hand side, and the button link, as well, on the left-hand side. So, you don't type on the actual button itself. You do it all from the blue menu. So, the Buy It Here text, that's fine. There's already an Amazon link in there. But, really, what you want to do is type in the web address of your company or, whatever, not your company. Sorry. It's the resource that you're recommending - where people can buy it. So, it's usually going to be, like, Amazon, isn't it? Something like that. People can buy that quickly.
So, that's one resource immediately done. We just need to replicate those steps for Item 2 and Item 3. So, let's see how that's done again.
So, the first thing you do, click on the image. Go over to the blue menu. Select Change Image. Select Upload an Image. Find wherever the item is saved on your computer, wherever the image is. Double click it to upload it. So, this is now a fitness mat. So, we're going to customize the text in the headline. We're going to customize the main body text below. We want to describe what a fitness mat is. People know what a fitness mat is, but we're trying to convince them that it's a good idea for them to buy it. So, let's do that.
Again, we're showing our expertise. We're showing our experience. And we're allaying some of the fears and doubts that a reader may have. So, that's our job.
Again, we want to customize the Buy It Here button. So, we click that and go over to the blue menu. You could change that to Buy It Now if you wanted to. It's up to you. On the right-hand side. And, then, you want to update the link to whatever that should be. Amazon.com/fitness- mat. It's not, but you know what I mean. So, again, once we're happy with that, we're going to Save our progress, close the blue menu, scroll down, and we've only got one more item to recommend.
It's the same thing. We'll just go through the steps again. Kettle Bells. That's the Resources page done. So, we're going to close the menu, go to Save, go to Zoom Out. And you can see now that our Resource Guide is really taking shape. So, let's start from the start again.
We're going over to the left-hand side. We're going to the Pages tab. If I go to the Cover page, we've got 3 Pieces of Equipment You Can Use to Get Fit. The Cover page looks awesome. It's customized with our own content for our own specific purposes. If we go to the Introduction, it's the same. We have About This Guide. "Sometimes getting fit can seem like an impossible task. Although I've been a personal trainer for 10 years, I used to be a couch potato." So, we're introducing the content of the Resource Guide. We're giving it a little bit of context, and we're highlighting our expertise.
Then, we're going to the Resources page, and that consists of skipping rope, a description of what a skipping rope is, why people should be interested, and where they can buy it - a fitness mat. A description of what a fitness mat is, why people should use one, and where they can buy it. And, finally, the kettle bell. A description of the kettle bell, the description of a kettle bell, what it is, why people should be interested, and a link to where people can buy it. So, the Resource Guide is a really simple format. There's no point in over-complicating it. It's effective because it's simple. People want recommendations. They want to know why you are recommending them. And they want to know where to buy it. It's as simple as that.
So, the final page that we're going to customize now is the Call to Action. A Call to Action page, I think, like the Introduction, should be included in every single lead magnet that you make. The purpose of a Call to Action is to sort of gently nudge people along to the next stage in the buying cycle. So, let's say that the maker of this Resource Guide is a personal trainer who specializes in good nutrition, like personal nutrition plans. A good fitness trainer will know that exercise and nutrition go hand in hand. So, this personal trainer, say, knows that people can't afford a lot of gym equipment, so he recommends three resources people can use to get fit at home without paying for a gym subscription. But, then, what they'll use this Call to Action for is to then promote their paid, premium products and services. So, in this case, it'll be like a nutrition plan.
So, the first step to getting someone to buy a nutrition plan is to book a consultation with them. So, we're going to use this Call to Action at the end of a Resource Guide to nudge people on to the next step in the buying cycle. And, again, like, I know you're probably not a personal trainer and you're not making a fitness Resource Guide, but you just need to apply this to your own industry.
So, if you're selling premium products and services, think about what services could complement the content within your Resource Guide. And that's what you need to be putting in your Call to Action. So, let me just zoom in a little bit and we're going to edit this. For our purposes, this is a fake fitness consultant. He doesn't have a logo, so I'm just going to delete that. I'm going to click on Image. The blue menu appears. I'm going to scroll to the bottom. I'm just going to delete that because we don't need it.
The text, Book a Consultation, is a bit generic. Like, it could apply to anything. It's not really going to grab people's attention. So, let's say exactly what we mean. Let's say, we're going to be offering a Free Nutrition Consultation. See the way that's spilled on the two lines, that text. I would quite like it all to just sit on one line. So, to do that, I'm going to reduce the size of this text by the left-hand menu until it all fits on one line.
So, now you can see we're offering people a free nutrition consultation. The initial consultation is free, but the paid products and services come after that. So, we need to tell people what the consultation involves. So, let's just edit this qualifying statement here. So, that pretty much sums it up. We're saying, "Yes, it's a free nutrition consultation, but I'm going to help you prepare something to take the work out of it for you." Like, "You've already done the work with the exercise, hopefully, with the items in this Resource Guide." And, then, "I'm going to help you take it a step further." So, that's how lead magnets actually lead on to paid products and services.
So, the only thing we have to do then is to… In this format here, you can see in this white box, there's like a testimonial of a previous customer. Now, this is a really important piece of social proof. Again, it helps to prove that you are an expert at what you do. If there's other people saying that, "Yes, I've used this guy's services in the past, and he's brilliant at what he does," then it's going to help to relieve some of those natural fears and doubts that creep into a reader's mind when it comes closer to the buying cycle.
So, if you have any testimonials from happy customers, in a Call to Action page is a great place to put them. So, let me just swap this one out for something else.
So, that's the testimonial. It's really simple. It's a short paragraph from a happy customer. And that will make all the difference to the conversion rate of this page. But, ultimately, we want people to take action. That's why it's called the Call to Action page, and that's why we include this big button at the bottom.
So, the button text is Book Your Consultation. And just like we edited the buttons for the action resources, let's do the same thing. So, we click in the button, we go over to the left-hand menu. I'm just going to change that to Book Your Free Consultation. I think that's just a little bit more powerful. And, then, we want to put in the link to our website - fitnessinc.com/free-consultation. I'm going to close the blue menu. I'm going to click Save. And then I'm going to Preview our Resource Guide because that's it finished.
Now, I can see those four pages. One, two, three, four. We didn't have to change much of the design because the template already did that for us. The content is all looking good. So, let's click Preview and see what this is looking like.
So, this is our Cover page. Like, really nice typography, like a strong image, like a nice bright background. These are the things that are going to grab people's attention, and they'll instantly want to read this Resource Guide because it's being well designed.
We have the Introduction page. So, people have got past the Cover page. They're now in the Introduction. And this is exactly where you need to impress them. So, the Cover page grabbed their attention. The Introduction is, hopefully, going to make them stick around. So, again, the keys to a good Introduction page is to prove your experience, to empathize with the reader, and to show them that you can help them in whatever situation they happen to be in.
After that, we've got the meat of the Resource Guide. It's a page where we're recommending three different pieces of fitness equipment. So, we've got the skipping rope, we've got the fitness mat, we've got the kettle bell.
And, then, finally, the last page of the lead magnet, of the Resource Guide, is this Call to Action where we're promoting our premium products and services. In this case, it's going to be like a premium nutrition plan. But that starts with a free nutrition consultation. So, that's what the Call to Action says. It gives a short description. We add some social proof with a testimonial from a happy customer. And, then, we add in the button at the bottom which links to our website. And that's how we're going to nurture people from not knowing about our company at all to gradually building trust and rapport with them through the content in the Resource Guide. And, then, we're eventually leading them on to our paid products and services with a Call to Action page at the end of the Resource Guide. Easy as that. Hope you enjoyed it.