eBooks are probably the most common type of lead magnet and it’s easy to see why. In this video I’ll show you how you can make your own without spending months locked up in a writing room.
Video Transcript
eBooks are probably the most popular lead magnet format, and it's easy to see why. In this video, I'll show you how you can make your own eBook without spending months locked up in a writing room.
Now, when I talk about eBooks, I'm not talking about best-selling novels but, instead, marketing e-Books that businesses produce to highlight their expertise in their industry. Since eBooks are typically longer than other content formats like blog posts, it gives you the opportunity to go into greater detail about your chosen subject. And it also gives you the opportunity to highlight your business as a thought leader, which will set you apart from your competitors.
In this example, the eBook gives readers a thorough explanation of content marketing. This book, in particular, was written by a software company who just happened to make content marketing software. It's about 30 pages long. It starts with a Table of Contents, has some information about the author, and a short Introduction. After that, though, is the real meat of the eBook, the real content.
In this particular example, the author used a shortcut. Instead of writing all this content from scratch, they just recycled some old blog posts that they had previously written and packaged them into this eBook format. And that's the biggest short cut you can take to writing your own eBook lead magnet. I'll show you how to do that in this video.
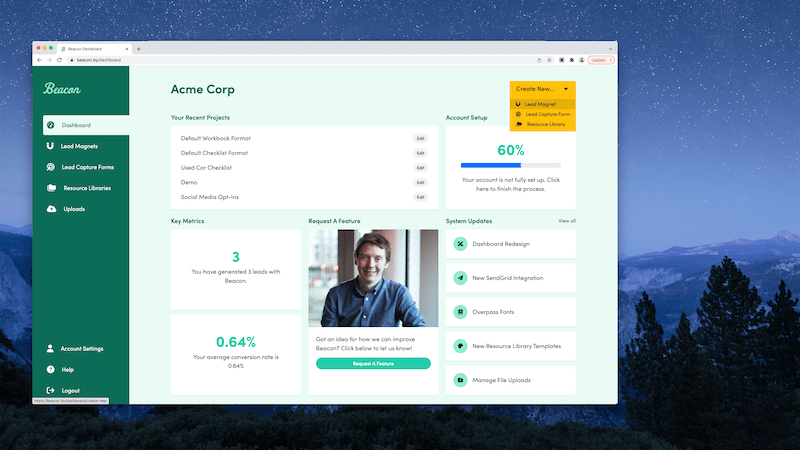
Creating an eBook Lead Magnet in Beacon
So, we're on the Beacon dashboard, and we're going to make an eBook. The first thing we have to do is Create a New Lead Magnet.
We're going to choose the eBook format. It's the second one along here. Understand, we are going to import some blog content because that's the secret to making an eBook without spending months writing it. So, just click Yes. And, then, you have a choice of your platform. If you're using HubSpot, choose HubSpot. But if you're using anything else, choose the Other option, and that's the way we're going to be making this eBook today. So, let's just click that.
And, then, basically, all we have to do is paste in the URLs from our individual blog posts into this box here. So, just paste them one at a time. As you can see, I've got a few tabs open here with some blog posts. So, I'm just going to copy the URLs, go back into Beacon, and paste them into this box, and then click Import. So, Beacon goes and fetches the blog posts and sort of saves it down below here. You can see the posts that you've already imported. We're just going to keep doing this for a couple of different blog posts. Again, just go to the blog post, copy the URL, go back into Beacon, and then paste the URL into this box, and click Import.

The temptation here is to go and grab like 50 or 100 blog posts and convert them all into an eBook. And, believe me, we've seen lots of people do this, but it's probably not a good idea because, when you think about it, a single blog post will probably transform into about 10 or 15 pages within a PDF. So, if you import 10 blog posts, that's already 100 pages in your eBook. If you import 50 blog posts, that's 500 pages, and that's a big eBook. Of course, the whole goal of a lead magnet is to get a lead, but we also want people to read our content. We want them to enjoy our content. And if we overwhelm them with too much information in a single publication, they're just not going to read it. And, then, you're not going to be able to nurture that customer through your content. So, what we would recommend is to limit your imports to maybe like five or six blog posts at the most. And if you have lots of blog posts that you want to transform into eBooks, we would recommend making like a series of eBooks instead of just one big eBook. So, lots of small ones that people can download and digest the information one at a time. That's the best way to do it.
I'm just going to finish off here by grabbing two more blog posts and importing them. So, you can see now that we've got four different blog posts imported into this eBook, and we're just going to click Create Publication.
So, we have the option now to choose the template, like the theme, for what our eBook looks like. We've got lots of different options here, and all of these templates can be customized to suit your own brand and to suit your audience. If you can't find one that's 100% perfect for what you're looking for, just pick one and then customize either the colors or images to suit your needs. I think we're going to go for this template here. The book is about content marketing, so we've got these nice reading glasses here. So, let's click that one.

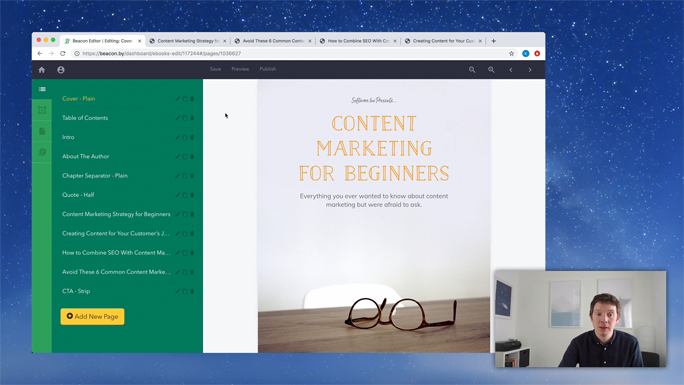
We're just going to give it a quick name. And, then, we're going to Create the Lead Magnet. So, if I zoom out, you can see that this is the cover image of the eBook. This is all place holder content in there at the moment, so we're going to change that later. But if you'll look down the left-hand side in the Pages tab, we can see all these pages that are already in our eBook. We have a Table of Contents, About the Author, Call to Action, and then towards the end of this list, we have the articles that we've imported.
So, if I click on that, you can see that the images have been imported, the headlines have been imported, all your links are preserved, your sub-headings are in there. So, most of the work is done for you. Like, all this content is imported.
But, you'll notice, if we go right to the bottom of this article, it's also imported some other parts of the blog posts that won't really make sense in an eBook. So, for example, these related articles don't really make sense in an eBook. So, we're going to go through each article and delete that type of content that we don't really need.
We've got a bit of work to do, so let's start with the structure of the eBook. We can see the way these pages flow. Like, it starts with a Cover page. That's brilliant. But I always like to add a Call to Action as the very last page in any lead magnet. So, let's just grab this Call to Action and pull it down to the bottom. And, then, I just want to reorganize the imported content so it starts with Content Marketing Strategy for Beginners. That's a good article to include as one of the first ones in the eBook.
Then, we have Avoid These Six Common Content Marketing Mistakes. I think that would be better after we learn the basics. So, I'm just going to move that to the end of the imported list. And, then, we have an article, How to Combine SEO with Content Marketing. And, then, also, Creating Content for Your Customer's Journey. So, I'm going to swap them around, and I think they'll make more sense in an eBook in that order. So, this is really part of the eBook creation process. You want to make sure that your content flows logically. You don't want to just throw a load of blog posts in there, call it an eBook, and expect people to download and enjoy it. It's up to you to make sure that this is a cohesive package of content. We can make various edits to make sure that happens. So, that's what we're going to do now.
So, let's go to the Cover page, and we're just going to make some changes to the content here. Company Name Presents is garbage content. Let's just change that to… Make up a fake name for our software company. Just something like Software Inc. Presents. And, then, we'll put in like the title of the eBook. I think it's Content Marketing for Beginners. See the way the for and the Beginners are on two different lines? I think it would be better if they were on one line. So, let's just reduce the font size slightly just until they go back up onto two lines. You can see that's got that nice sort of triangle effect going on with each line getting slightly larger. So, it just looks a little bit better.
We'll close this menu, and then we're just going to customize this Summary text on the cover page. So, this is your chance to, like, if someone's browsing the web casually and they come across the thumbnail for your eBook, you want to make sure that this introduction text really helps to entice them so that they're going to want to actually read the content of the eBook. So, rather than the dummy text that says, "This is a short summary that should describe the purpose of this particular publication," let's just change that to, "Everything you ever wanted to know about content marketing but were afraid to ask." So, it's a nice, short summary of what we're trying to get across in this eBook. I'm going to close this menu, Save our progress. That's the Cover page done. We're going to move on now to the Table of Contents.
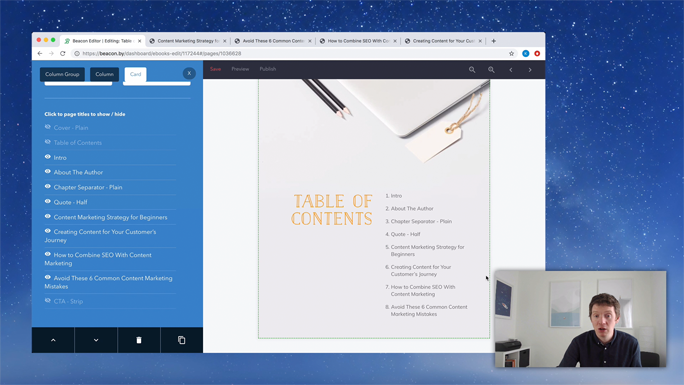
The Table of Contents is already set up. It has the headline, Table of Contents. That doesn't need to change. But you'll notice that it doesn't quite include all of the pages that are shown on the left-hand side. So, whenever you add more pages or take pages out of your eBook, you're going to want to click on this Table of Contents text just to refresh it. And you'll notice on the left-hand side, this is a full list of all the pages in the publication, and we can Hide or Show various pages that we want to appear in the Table of Contents.
So, for example, I don't want the Cover page to be on the Table of Contents. It's a bit of a waste of time. Same with the Table of Contents. I do want the Intro to appear. You'll notice when I click this little eye icon, pages will show up here. And we do want the About the Author page to be included in the Table of Contents. So, let's click that again. I'm going to talk more about Chapter Separators later, so let's leave that in for now. And the same with Quotes. And, then, we have all the actual pages. Like, this is the real meat of the eBook. These are the articles that we've imported from our blog. So, I'm going to leave all them to be visible. And we don't want the Call to Action to appear in the Table of Contents either. It's a bit weird. So, let's just take that out. So, that's our Table of Contents page all done. It's looking good. So, we can move on. We're making good progress.
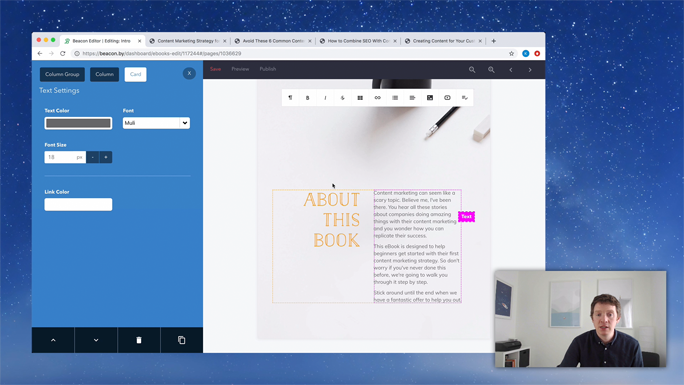
The next page, I think, is the Introduction about this book. So, like most eBooks, I would always recommend to include just a brief page. Like, this is only a couple of paragraphs just describing what the book is about. And, again, this is for your casual readers who have come across the eBook. And reading an eBook is a big commitment, so you want to entice them and make sure that they're going to stick around to read your content. So, this is your opportunity to do that. An Introduction like this is a good opportunity to maybe summarize the key themes of the eBook and also to share some information about who the eBook is aimed at. Obviously, we know that this is a book for content marketing beginners, but let's just make that clear in the Introduction so that everybody knows it. So, let's just edit this content.
So, that's the content for the Introduction page done. I'm just going to Save my progress, and we're going to move onto the next page which is a brief page about the author.
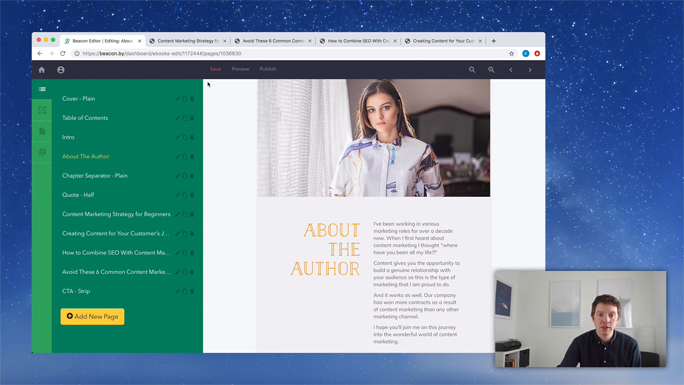
So, this is a great opportunity for you to establish your credibility. Now, remember, if you're putting together an eBook, people are going to want to know who's written it, so they know whether to trust the content within the eBook. So, it's a good idea for you to really tell them about yourself and why you're an expert on whatever eBook that you're writing. But it's also a great way, really, to enhance your personal brand or your company brand so that people trust you more. And, then, when it finally comes to pitching your paid products or services, they're going to be more likely to buy from you as a result. So, let's just do that.
All right. So, that's the About the Author page done. I'm going to close this menu, click Save, and then move onto the next page.
This is what we call a Chapter Separator page. So, let me just Preview this eBook just to show you when these become useful. So, we've got a Cover page. It looks great. Nice, visually impactful pages here to start with, all the way down to the About the Author. Then we get the Chapter page, Quote page, and then we get into the actual content. This is what we've imported from a blog. As you can see, there's quite a lot of pages here, and it's quite text heavy. So, that's one article. This is another article starting.
And, again, more and more pages until the next article begins as well. This is quite a lot of text here. So, what I like to do is to add Chapter Separator pages in between each one of these articles. I know it's not strictly true that each article becomes like a full chapter, but I think when readers are scanning through your document, it makes sense to break up these long reams of text. It helps stop people in their tracks. It helps to grab their attention. And it also helps to give a sense of the content that's in the eBook. So, we call them Chapter Separators. You don't have to use them just for chapters. What we're going to do is, we're going to use them to sort of book end each article that we've imported. So, let's go ahead and jump back into Beacon so we can do that.
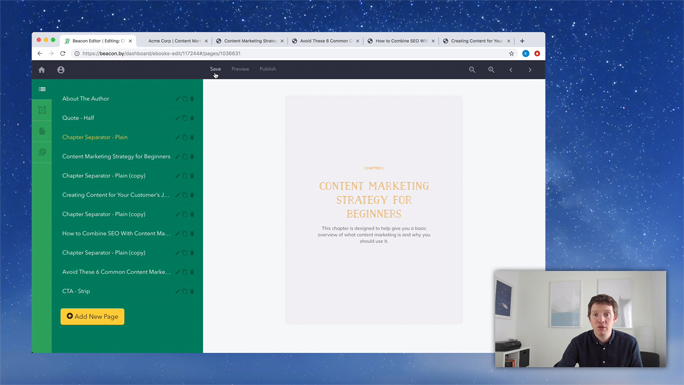
So, this is our first Chapter Separator page. As you can see, we've got one, two, three, four different articles. So, we need four Chapter Separator pages. Let me just Duplicate this four times. So, that's one, two, three, and four. So, now we've got four Chapter Separator pages lettered throughout our document. Let's just move these so that there's one before every article. We've got one for the first article. We need another one for there. So, let's grab this one and put it there. So, then, I'm going to go through each one of these chapter pages and just change it to say Chapter 1, Chapter 2, Chapter 3, Chapter 4, and customize the title. So, let's start with the first one.
Obviously, it's still Chapter 1. We're just going to leave that as Chapter 1. And then we're going to change the chapter title to the article title. So, in this case, it's Content Marketing Strategy for Beginners. And, again, with the cover page, this text is a little bit too big, so it's flowing onto too many lines. So, I'm just going to reduce this text down to make it a little bit more compact. That's perfect. Again, we've got that sort of inverted triangle going on. Each line gets smaller, so it's sort of a nice visual thing that we've got going on there. And, again, we're going to want to put in a short summary of what this chapter is about. Again, this is for people scanning through a long eBook. It helps them to sort of visualize exactly what the content of the eBook contains without having to read the whole thing.
So, Content Marketing Strategy for Beginners. Just a nice, short, simple description. I'm going to zoom out, and you can see that the content is more pushed down to the bottom half of the page, and that's because we've got a spacer at the top here. So, I'm just going to reduce the size of this spacer slightly so that our content is sort of aligned vertically in the middle. So, that looks much better now. I'm going to close out the blue menu, hit Save, and we can do that then for the rest of the Chapter Separators.
So, again, just go into the Chapter Separator. We're going to customize this to be Chapter 2. Let me zoom in so you can see. Chapter 2. And this chapter is called Creating Content for Each Stage in Your Customer's Journey. Let me zoom out again. And, again, this is far too much content on a single line, so let's just reduce the size of this down. And, again, it's looking good. You don't have to be exact here. This font size is 52. Whereas, I think on the previous page it was 47. So, we don't have to be exactly the same. But what we do want to make sure is that each page looks good individually. So, again, let's just reduce the height of the spacer just to center align the content on that page. And we could go through all these other chapters, too, but you get the idea. So, I'll not bore you with that detail. Let's go on, then, and edit this Quote page.
So, Quote pages, I love to put just before like the meat of the eBook begins. Like, before you get into the real nitty gritty. I think it's a great way of summarizing the overall theme of the eBook with a content or quotation from a reputable source. So, generally, you want somebody that the audience has heard of just to add a little bit of wit to the content in your eBook. In this case, I'm just going to Google for content marketing quotes. I'm going to this first result here. This one's pretty good. "Content is anything that adds value to the reader's life." That sums up perfectly what content marketing is all about. And I also think it's a good sentiment for people that are new to content marketing to sort of get that into their heads. So, let's just add that as a quotation in our eBook.
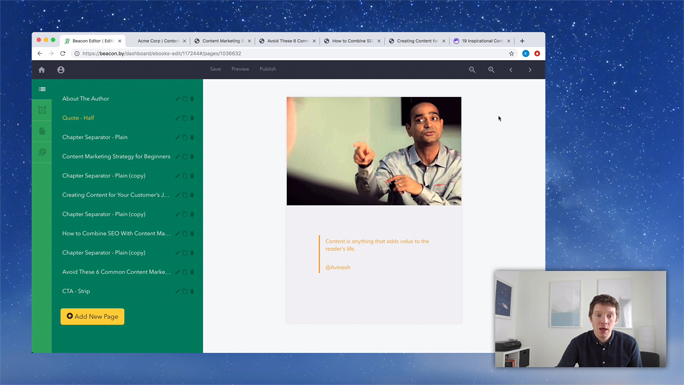
You just click on the Quotation Card here and then you edit it over on this left-hand side, so it says, "Content is anything that adds value to the reader's life." Perfect. And I think I need the source of this quote. It was @Avinash on Twitter. So, I'll just put in @Avinash's handle so people know where that's coming from. And, of course, we need to customize this photo. Like, that is not @Avinash, so let's just click on this strip, and it's a background image on the strip. So, we're just going to click to select Image. We're going to upload an image. I have one saved on my desktop. So, let's just go for that. And that's him. That's the source of the quotation. That's @Avinash. So, it seems like there's not a lot of content on this page, but, again, we're producing an eBook, and we just don't want to overwhelm people with lots of dry, reams and reams of text. So, I think quotations like this do a great job of breaking that up and also just adding a little bit more substance to your eBook.
So, let's hit Preview again just so we can get an idea of how our eBook is shaping up. So, we've got our nice Cover page, we've got our Table of Contents. And if I click on any of these pages, it's going to jump us down. So, that's our quote. And, yet, we've got our first chapter heading. That is our first article. So, that's perfect. And, when we're scrolling down, once we get to the end of this article, we get this nice, new, big chapter separator. You know what I'm saying? It's not necessarily that there's lots of different articles in each chapter, but there are lots of different pages. So, I think it's worth putting in a chapter separator. You'll notice, again, that we still have to get rid of content that's been imported from our blog. So, let's jump in and do that.
Let's go to our first article which is, Content Marketing Strategy for Beginners. I'm just going to zoom in so you can see this. You'll have to go through each article, and sometimes there's content that doesn't translate to an eBook like this Click to Tweet link. It doesn't make sense in an eBook. It only makes sense in a blog post. So, let's just get rid of it. I'm just going to delete it. And we're going to keep scrolling down. I don't see any other examples of content that shouldn't be there. I think that's it. So, this Recommended Articles at the end, place your cursor at the end of where we think the article stops. Highlight to the bottom and then just Delete that. So, now, this article makes sense in an eBook. People aren't going to think, "Why are they asking me to click links or to read recommended articles in an eBook?" It makes sense in a standalone eBook. What you also might want to do is make sure that each article sort of flows onto the next one. So, you could add just like a bridging paragraph at the end of each article.
So, to do that, just type in something like, "In the next chapter, I'll go into more detail about how you can apply these principles to a customer's journey." And it just ties all the articles together, so it feels more like a cohesive eBook rather than a collection of random articles thrown together. So, let's go through and do that for the rest of our articles. So, that's the first one.
The second one, we can see again, like it's got these sample suggested links at the end. I'm going to delete them, including this Call to Action at the end. Delete all end. Let's go back up through. We don't need Click to Tweet. Let's get rid of that guy. And this is all looking good. So, that's that article done. We're going to go to the next page. This should really be Chapter 3. And go to the next page which is the article, "How to Use SEO in Your Content Marketing Strategy." We don't want Click to Tweet. So, let's take that out. And we don't want all these suggested articles at the end. So, I'm going to highlight them and Delete them. We're making good progress. I think we've got just one more article to do. So, again, this should be Chapter 4. And on to the next one. So, we're starting at the bottom here. So, let's take all these Additional Resources out. I'm going to highlight them and then Delete on the keyboard.
This is a Call to Action. I'm going to take that out. It's fine in a blog post. Like, we're promoting our software in that. We don't want to do that in an eBook article because we have a nice Call to Action page at the end. So, let's just take that out. We've got a big gap here at the end of one of the pages. This image is just a little bit too large to fit in that gap, so let's just reduce that down just so the content isn't so gappy. That's much better.
We've got another Click to Tweet link, so let's get rid of that. And another big gap there, so let's just click in that image and use the handle in the bottom corner to reduce that down. A bit of a gap there, so let's just delete that. So, that is, I think, all the articles done. I'm going to open up the Pages tab to take a look. Yep, the articles done. Finally, we're just going to move onto the Call to Action.
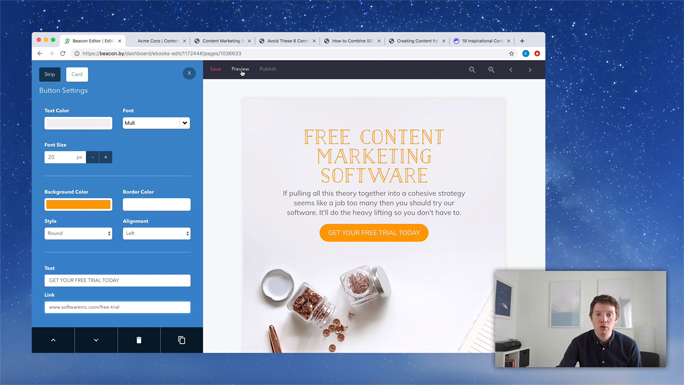
Again, a Call to Action should always promote your paid products and services. It's great to include this at the end of every lead magnet that you create because, by now, you should have built up trust with the audience from the quality content in your lead magnet so they're going to be more receptive to your paid products and services. So, let's just customize this. Instead of a Call to Action, we're going to write something else.
So, that is the headline, Free Content Marketing Software. Remember, we're pretending that this eBook is made by some software company that makes content marketing software. And the description says, "If pulling all this theory together into a cohesive strategy seems like too much, then you should try our software. It'll do the heavy lifting so you don't have to." So, the idea, really, is that we've built up trust with the audience, we've taught them about content marketing, now we want them to apply that theory using our software. So, let's include a button, just a link to like a free trial. So, we'll change the button text to something like "Get Your Free Trial Today," and we'll put in the link to be softwareinc.com/free-trial.
So, let's just Preview this eBook now that we've finished it to see what it looks like. We've got this lovely, visually striking Cover page. We've got a Table of Contents that sort of links to all the individual pages included. So, if we click, then… Actually, I'm just looking to see, the Chapter Separators all have this Chapter Separator name, and we're sort of repeating ourself with the customer, like, the article title. So, let's go back into Beacon and just tidy that up a little bit.
So, we're going into the Table of Contents, and this is on the Pages tab. If we have the Chapter Separator and we have the article in the Table of Contents, we're just going to want to link the Chapter Separator rather than both that and the article. So, let's go into the Table of Contents page and just tidy that up. I'm going to click on the Table of Contents page. You can see that that's been refreshed now with the updated content in the book.
We're going to hide this Quotation page. Like, it's great to have an eBook, but you don't really need it in the Table of Contents. And we're going to have the Chapter Separators instead of the articles. So, let me just hide all the articles and leave the Chapter Separators. So, you can see that the Table of Contents is much neater now. But, it's still saying Chapter Separator. People won't know what that means when they see your Table of Contents. And these titles for the Table of Contents, they're automatically generated based on the page name. So, if I close this menu, you can see that the page name is Chapter Separator Plain Copy. And that's why it says Chapter Separator Plain Copy here. What we have to do is rename each of these Chapter Separators. And we're just going to use the article title in place of that. So, I'm just going to click this little pencil icon to rename the page. I think it's Content Marketing for Beginners. So, just change that. Then hit Rename. So, then, if I click on this Table of Contents copy, you'll see that that updates the Content Marketing for Beginners. So, let's just do that for each of the other pages now.
All right. So, we've renamed all those pages. Let's go back into the Table of Contents. And, remember, we're just clicking on the Table of Contents itself so it can update. And you can see now that our Table of Contents page has the accurate page titles for all the content within the book. So, we've got Intro, About the Author, Content Marketing for Beginners, blah, blah, blah.
So, let's go back into the Preview, and that should be everything we need to do for our eBook. We've got the Cover page looking great. Table of Contents is accurate. If we click the items, it will bring us directly to the page. About this Book. About the Author. It's all looking good. We've got this brilliant quote from @Avinash in there to really help set the scene. We've got the first chapter page which is looking good. So, then, that leads us into the main text.
Remember, these are the articles that we've imported from our blog. That's how we've been able to create an original eBook in just about half an hour instead of spending months doing it. And once all this text seems like a bit much, then we're going to get to another Chapter Separator page so that that's broken up, so that when our reader is casually flicking through this eBook, they're not getting overwhelmed with too much content. It's book ended by these Chapter Separator pages.
And, then, finally, if we go right down to the bottom, we have our Call to Action which will help to promote our paid products and services now that we've built up some trust and credibility with our audience.
So, I hope you've enjoyed that. If you want to go ahead and make your own eBook, I think that would be a great idea.