Facebook Lead Ads are one of the most cost effective ways of generating targeted leads for your business.
Have you ever experienced the lead magnet tumbleweed? You know what I’m talking about - you spend days, maybe even weeks creating a lead magnet. You launch it and nobody cares.
Because the truth is that it’s just hard to build an audience. It takes time and patience.
Unfortunately not everyone has time and patience - you might work in a small marketing team and you're under pressure to generate more leads. You might run your own small business and you need to see results fast.
Whatever your situation, if you don’t have time to build an audience then you can move a little faster by investing some money in advertising.
Paid Advertising
Advertising means that you don’t have to worry about things like SEO, influencer outreach or partnerships - you can just take the bull by the horns and get some traction yourself.
Not everyone has lots of money to spend, but if you have the right strategy then even a small budget can go a long way.
A big part of getting the right strategy is choosing where to spend your advertising money. There are endless places - you could get a giant billboard, you could take an ad out in your local newspaper.
Unsurprisingly, I’m not going to recommend either of those options. Because here in the 21st century, we basically have two choices:
Today we’re going to be focusing on Facebook because when it comes to promoting lead magnets, Facebook has a few tricks up it’s sleeve that Google doesn’t.
The most important one is Facebook Lead Ads. In fact, I think this is the most underrated advertising technique on the internet at the moment.
What Are Facebook Lead Ads?
Facebook Lead Ads give you a big advantage because they reduce the number of steps required for a prospective customer to give you their contact information.
If we think about the traditional user flow for responding to an advertisement it typically looks something like this.

Traditional Web Ad
People see an ad at the side of their search engine, if they decide to click it they’ll be brought to your website where they’ll have to manually enter their contact information. Once they do that we can then send them their lead magnet - in this case it’s an eBook.
Alternatively, if we use Facebook Lead Ads, there are only 2 steps.

Facebook Lead Ad
Because of this there is much less opportunity for people to drop out of the process so conversion rates are going to be much higher and your budget will go a lot further.
"People can simply tap your ad and a form pops up – it's already pre-populated with their Facebook contact information and ready to be sent directly to you"
Facebook’s official description of their Lead Ads feature.
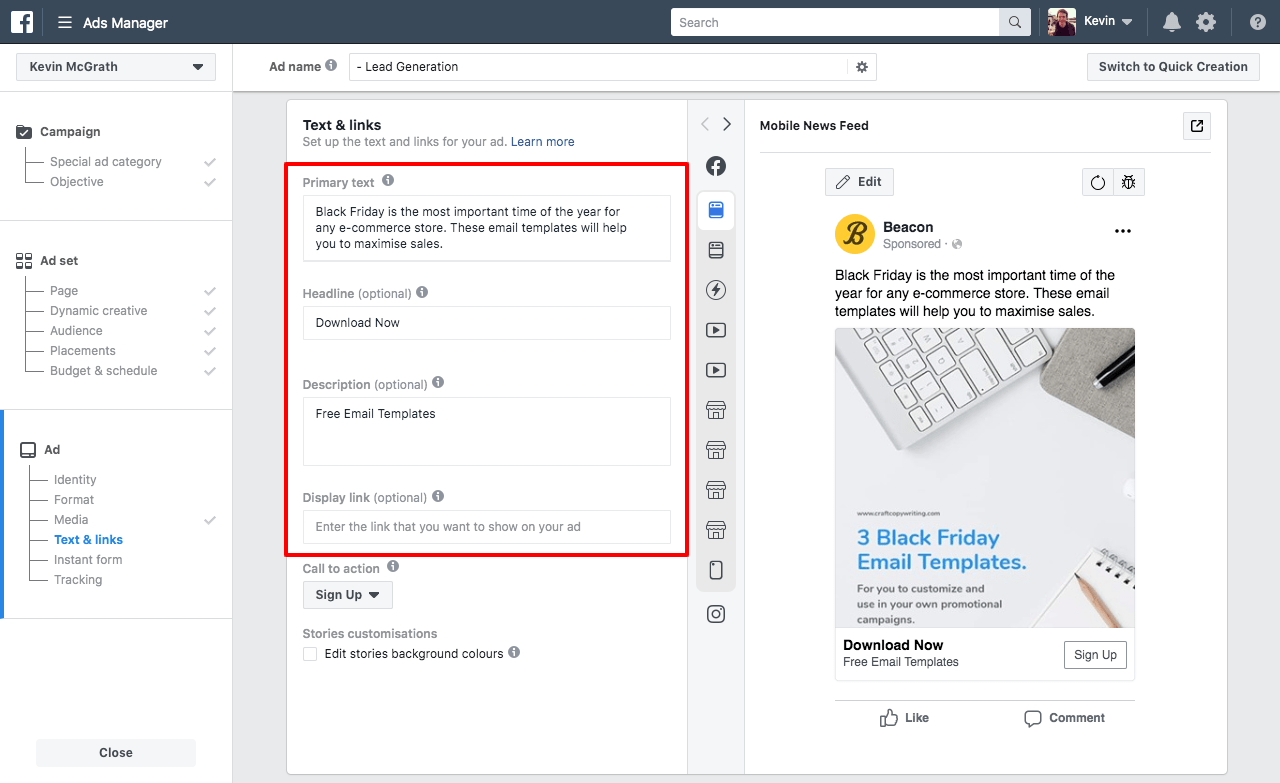
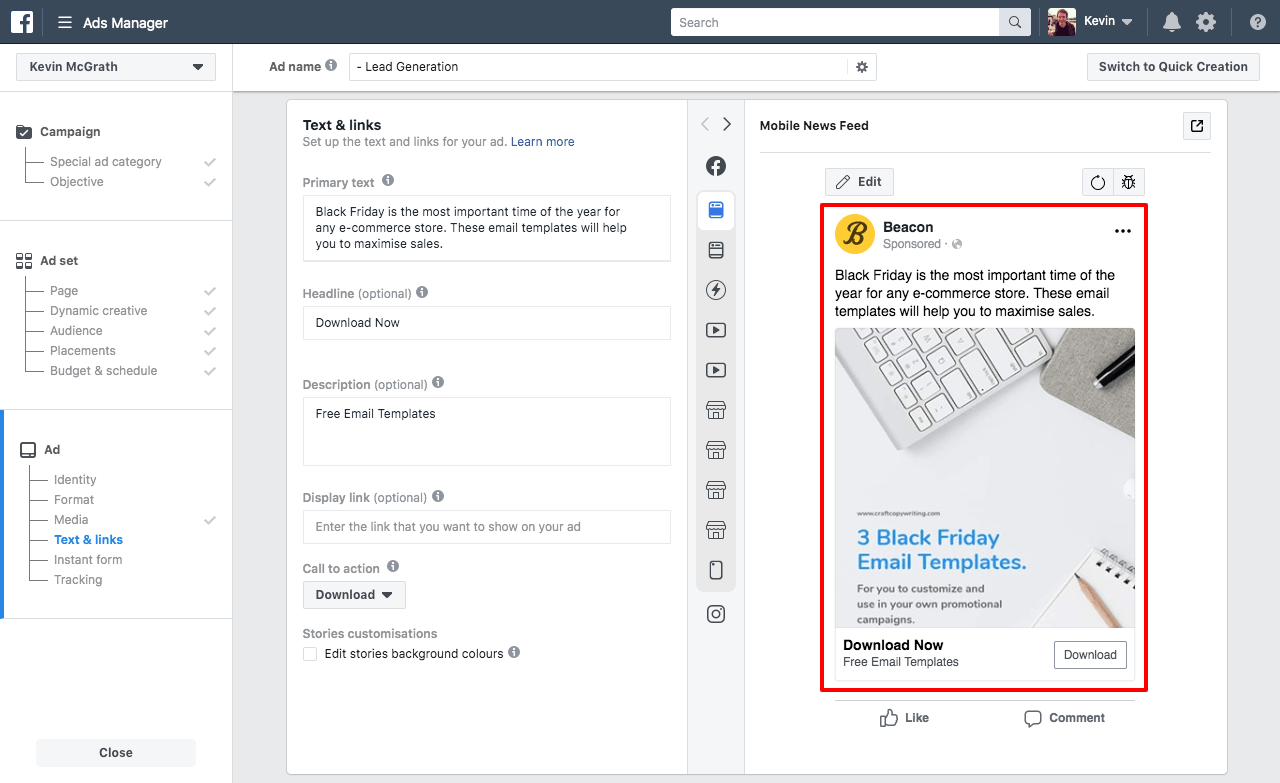
And this is what a Facebook Lead Ad actually looks like:
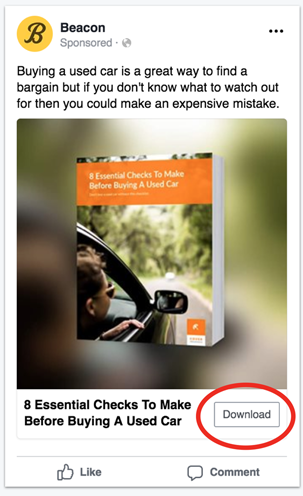
What people see in their timeline
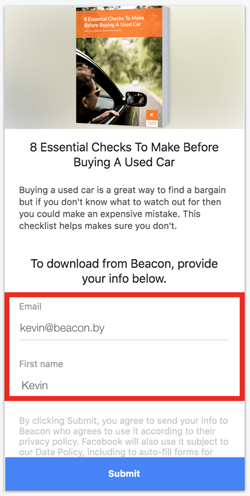
The pre-populated form
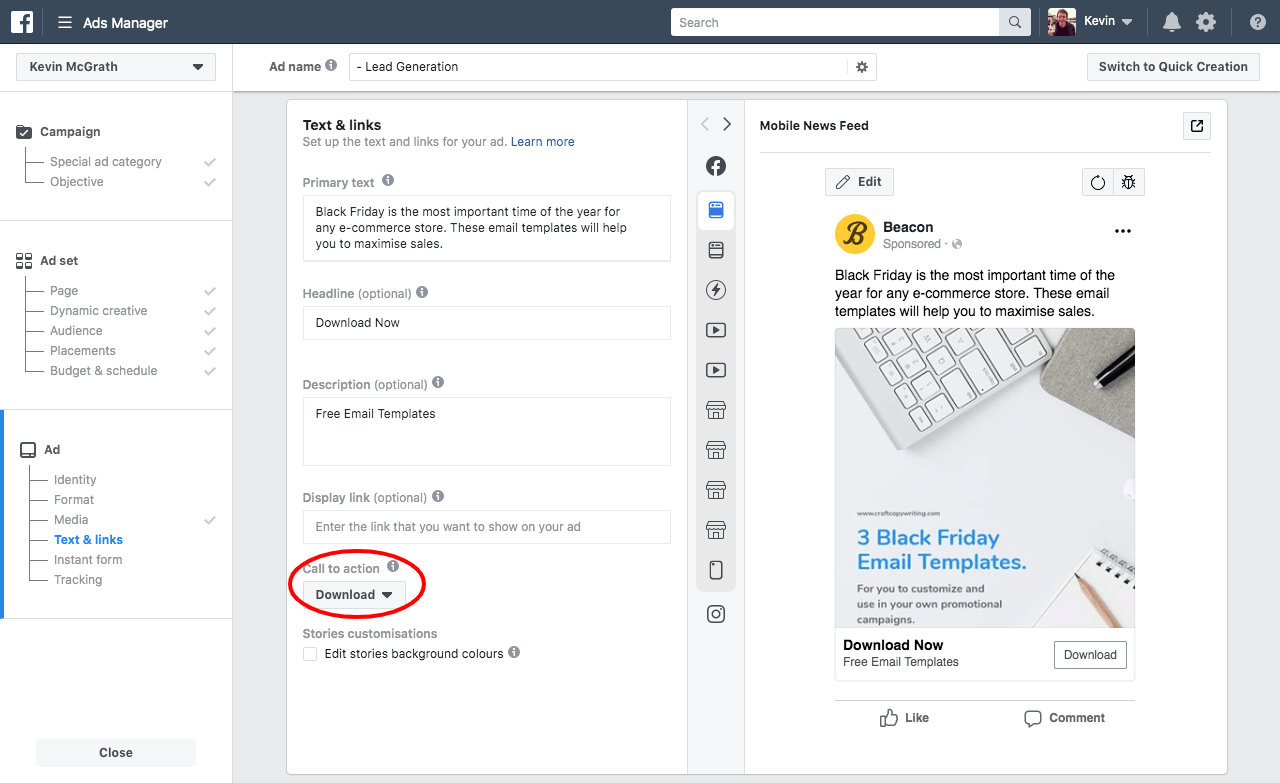
You’ll notice that the call-to-action button that I have circled here is ‘download’ and this is another reason why Facebook Lead Ads are so effective.
It’s no secret now that if you offer people an incentive they will be more likely to take action. In this case the incentive is to download a checklist. So people will be more likely to click this ad than if the call to action just said something like “visit our website”
And once people click on the ad, the form on the right will appear. You’ll see in the highlighted section that the form is already populated with the reader's contact information.
This is the magic of Facebook Lead Ads. Because people’s contact information is already stored in their Facebook account, that information can be used to fill out the form so the user doesn’t have to.
This is vital because it leads to higher conversion rates - particularly on mobile devices where people are traditionally more reluctant to complete forms. And since 96% of Facebook users access the site from mobile devices, this is a pretty big deal.
How To Create A Facebook Lead Ad
Getting Started
Before we get started you’ll need 2 things.
- A facebook business account because you can’t create ads with a personal account.
- Your own lead magnet. Whether that’s an ebook, a checklist or a resource guide you’ll need some sort of incentive to offer people in the ad.
The lead magnet that we'll be using in this tutorial is a set of email templates that a copywriting business might use in the run up to Black Friday.
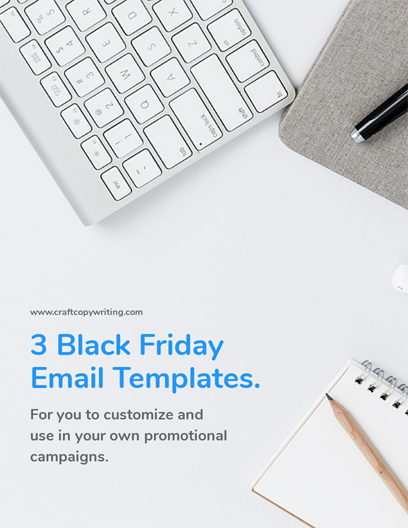
This is the lead magnet that we'll be promoting.
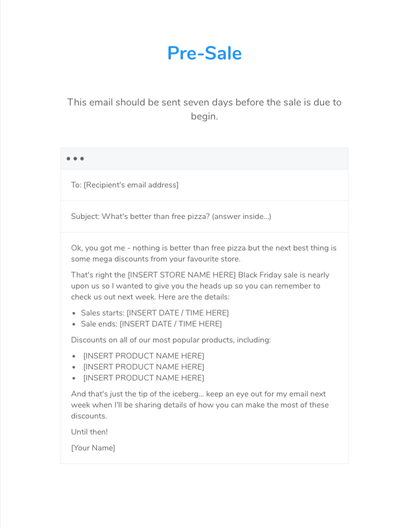
One of the email templates inside the lead magnet.
Initial Setup
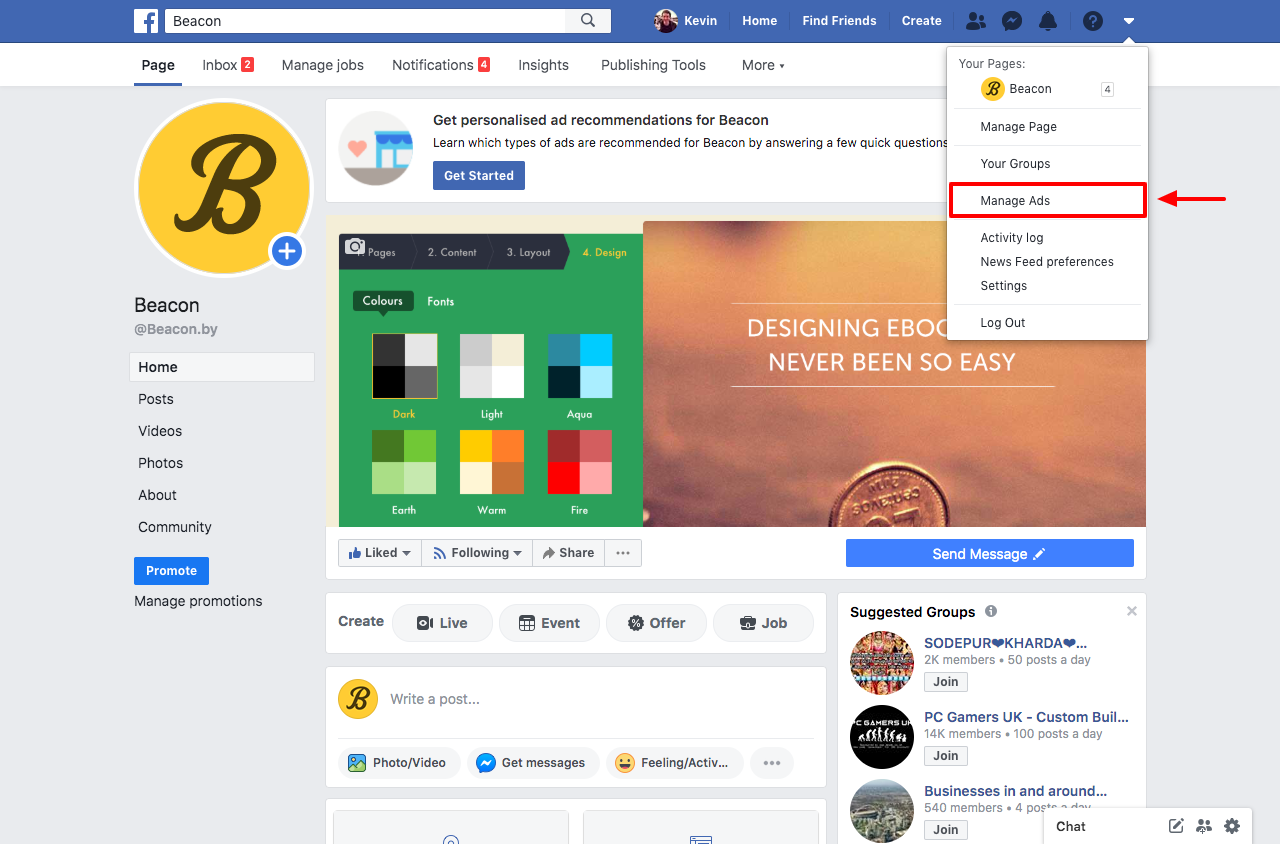
When you log in to your Facebook Business account, select 'manage ads' from the drop down menu:
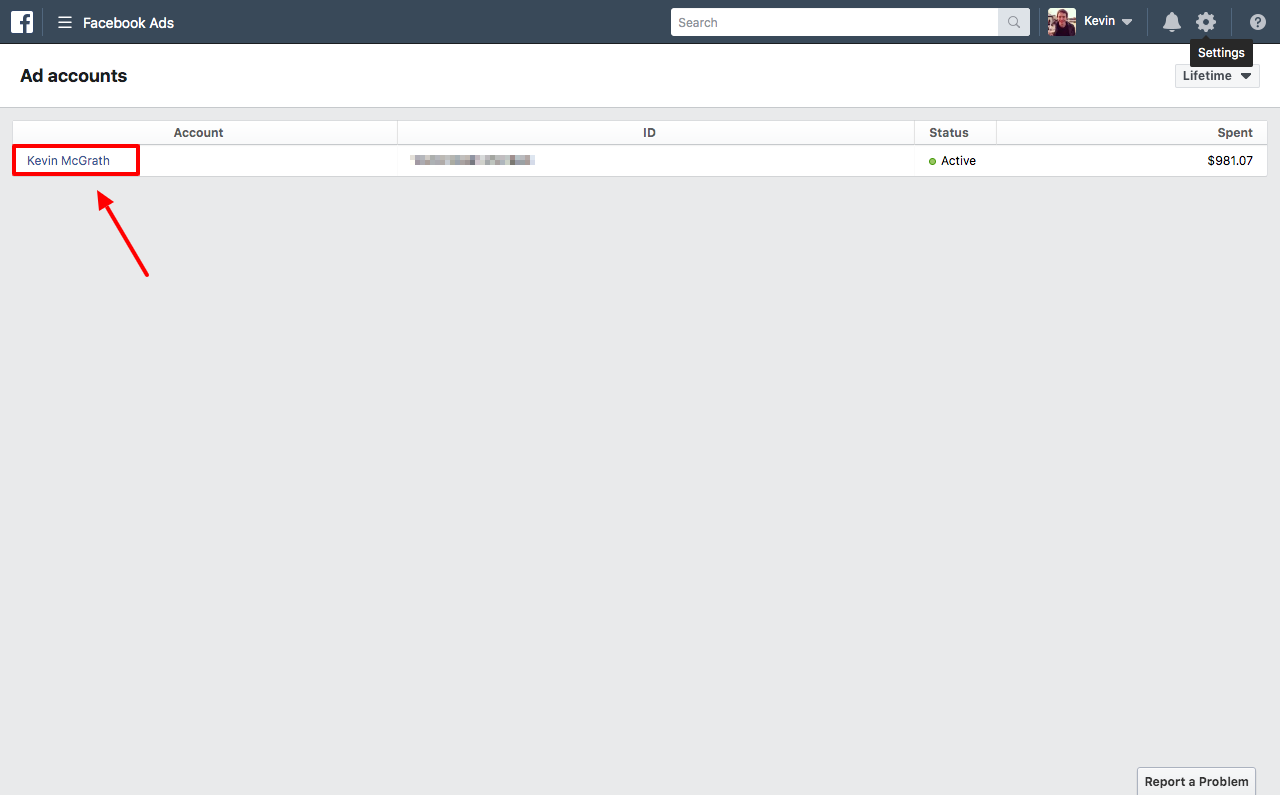
Click on the name of the Facebook Ads account you want to use:
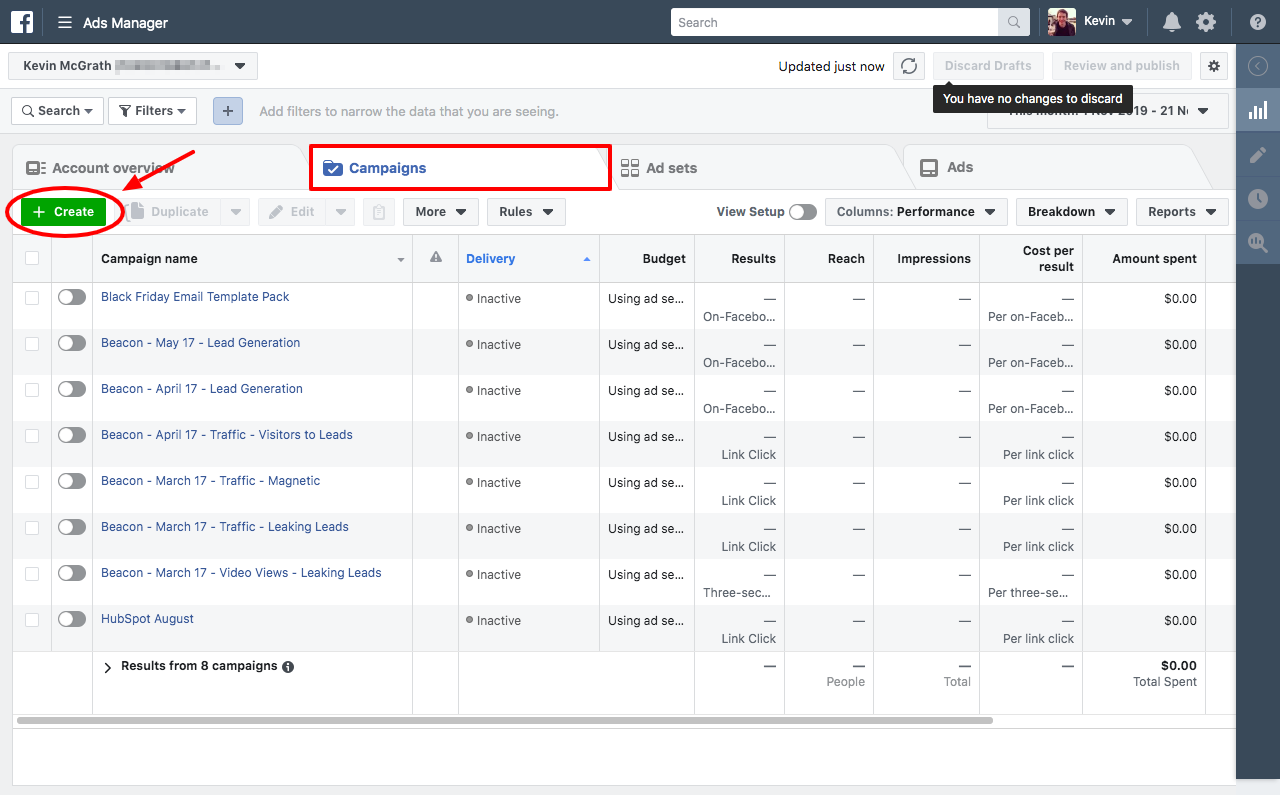
With the 'Campaigns' tab open, click the 'Create' button:
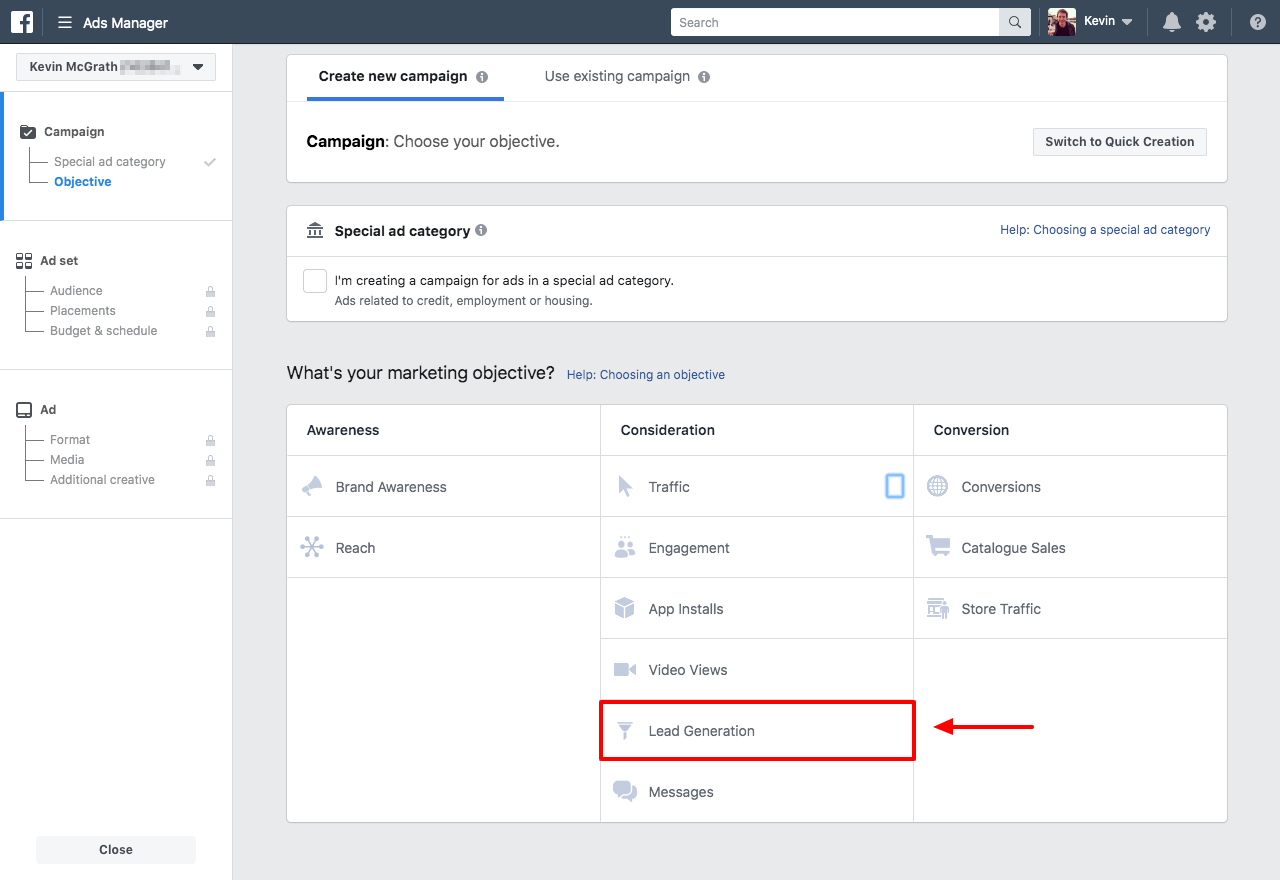
Select 'lead generation' as your campaign objective:
Give your campaign a suitable name and click the 'continue' button
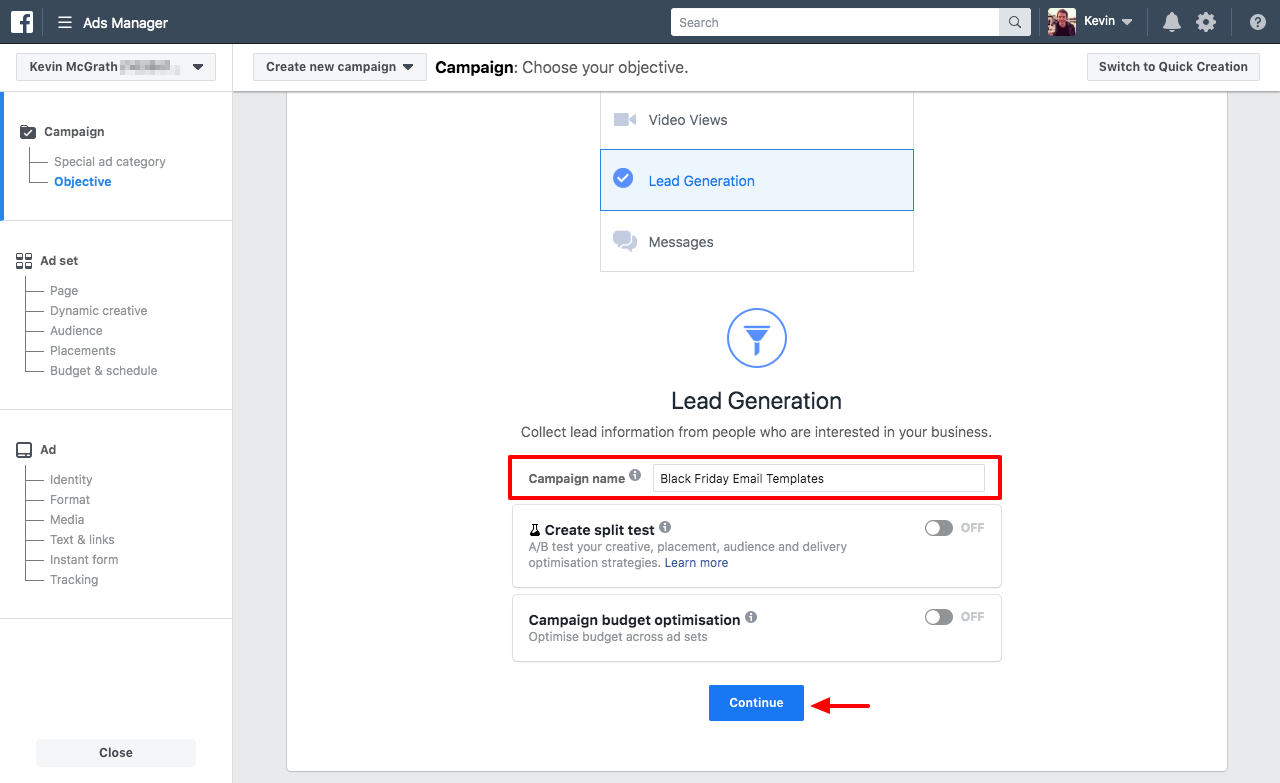
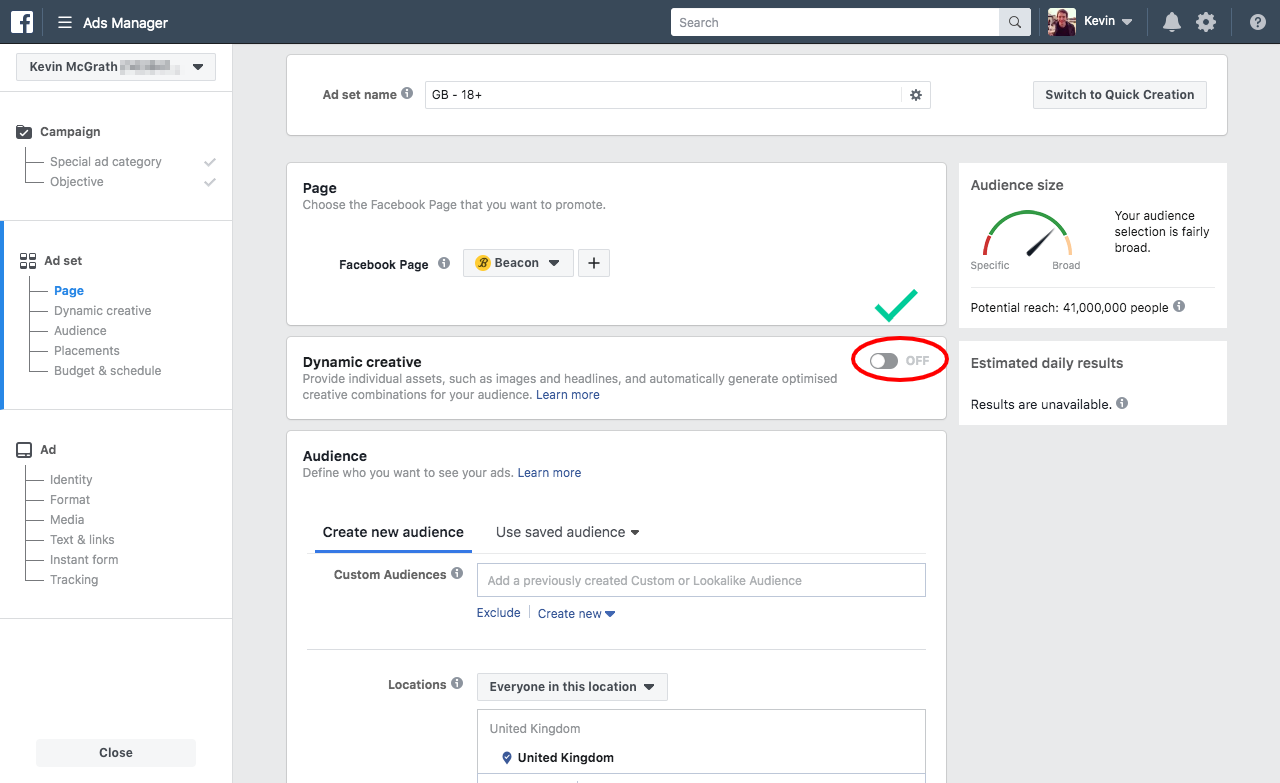
The 'dynamic creative' option allows you to add multiple variations of the ad's images, headlines etc. This is a good option when you're feeling more confident with Facebook Ads as it will help you to refine the ad's performance but if this is your first time then I would recommend leaving this setting disabled.
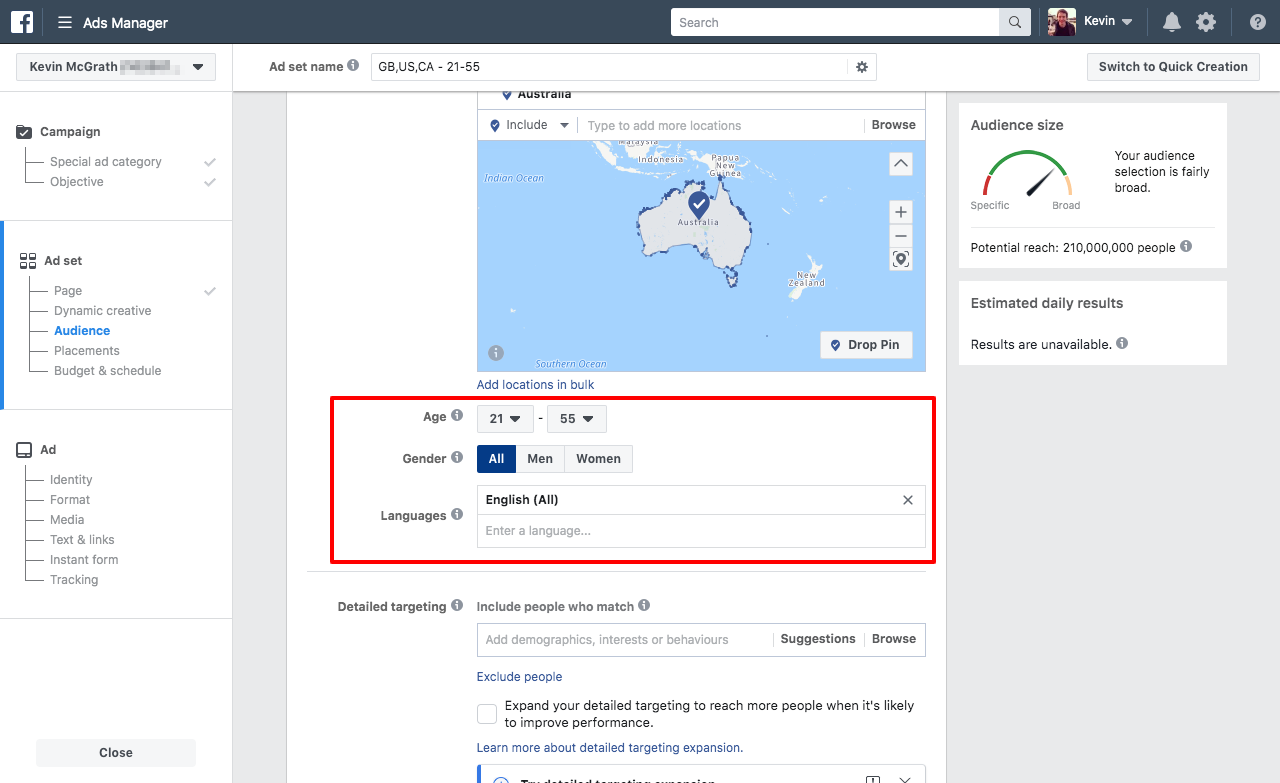
Defining Your Audience
Facebook Ads are so effective because you can be very targeted about who will see it. This means that you can use your budget more efficiently by only displaying the ad to people who are likely to respond positively to it.
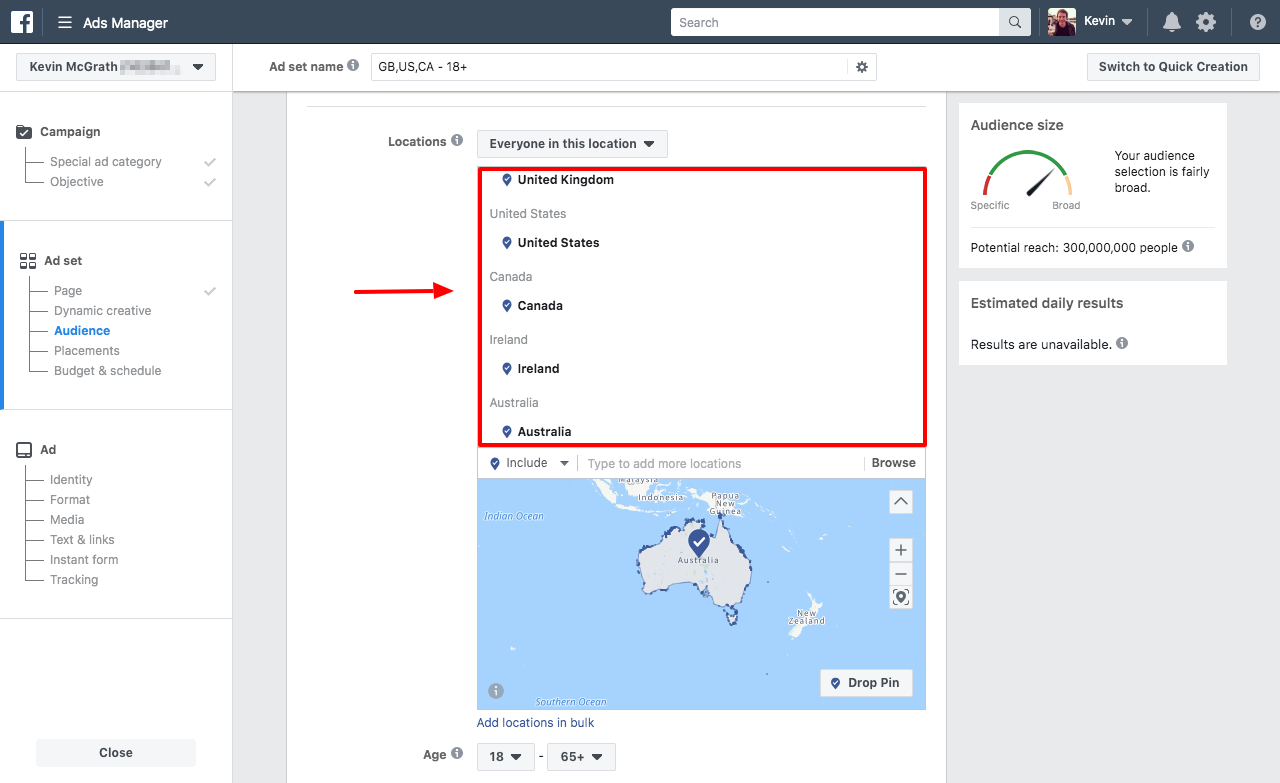
In terms of location, this will be very obvious for some businesses. For example, if you run a local restaurant then you're going to only want to target people in your specific area. However, if you run a copywriting business (as in our example) then your potential customers are likely to be spread over a larger distance. For this reason we're going to target people with Facebook accounts in any english language speaking country.
The same principle applies to the other demographic categories: age, gender and language - choose the values that most closely reflect those of your potential customers. The more precise you can be, the more likely it is that your ad will be seen by the right people.
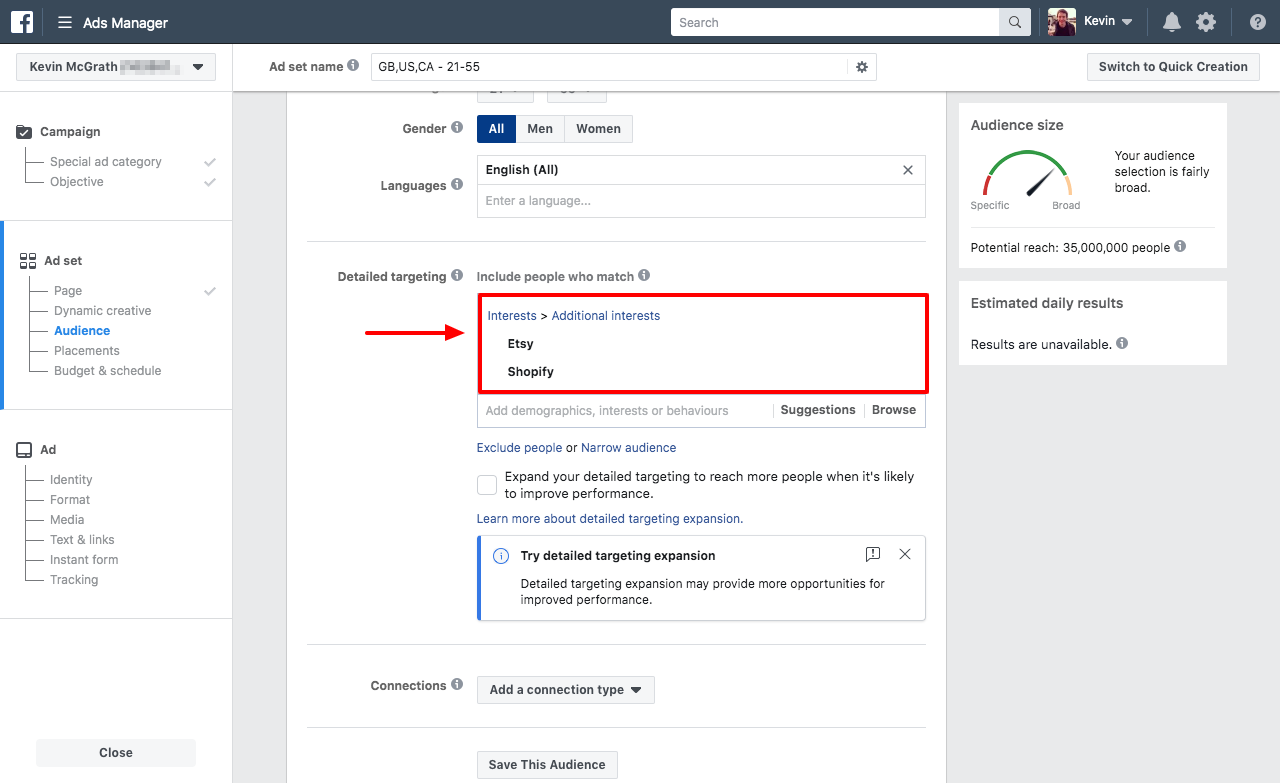
Detailed Targeting
The detailed targeting options are where things start to get interesting. These are the options that allow you to go past basic demographics (gender, location etc) and dive into the interests and hobbies of Facebook users.
In our example we're trying to appeal to people who run e-commerce stores. It's unlikely that people will have 'e-commerce store owner' listed as an occupation or a hobby. In this situation you have to go a little broader - what are the tools and services that an e-commerce store owner might already use?
Well, Shopify and Etsy are two of the biggest e-commerce platforms in the world. It's a fair assumption that a large number of the people who have these listed amongst their Facebook interests either run an existing store or plan to start selling online. Of course not everyone who has these sites listed as interests will be potential customers of ours but a large portion of them will.
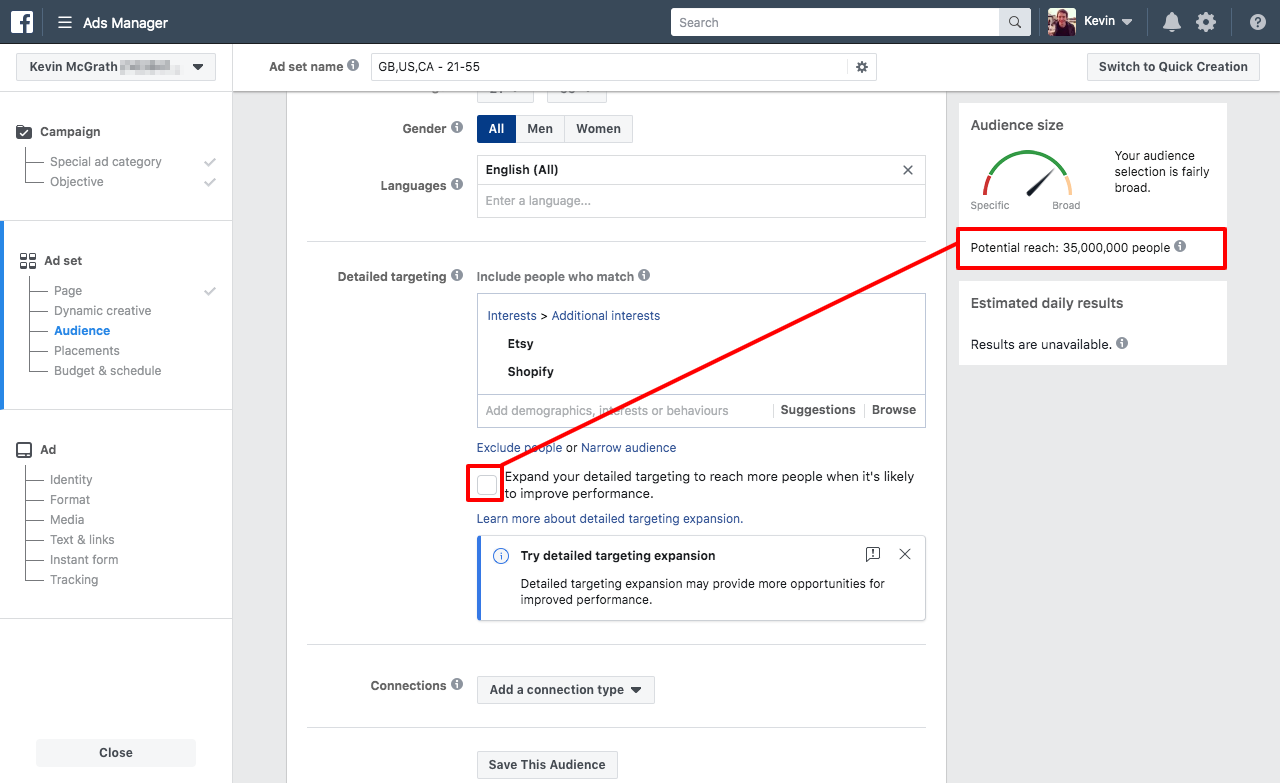
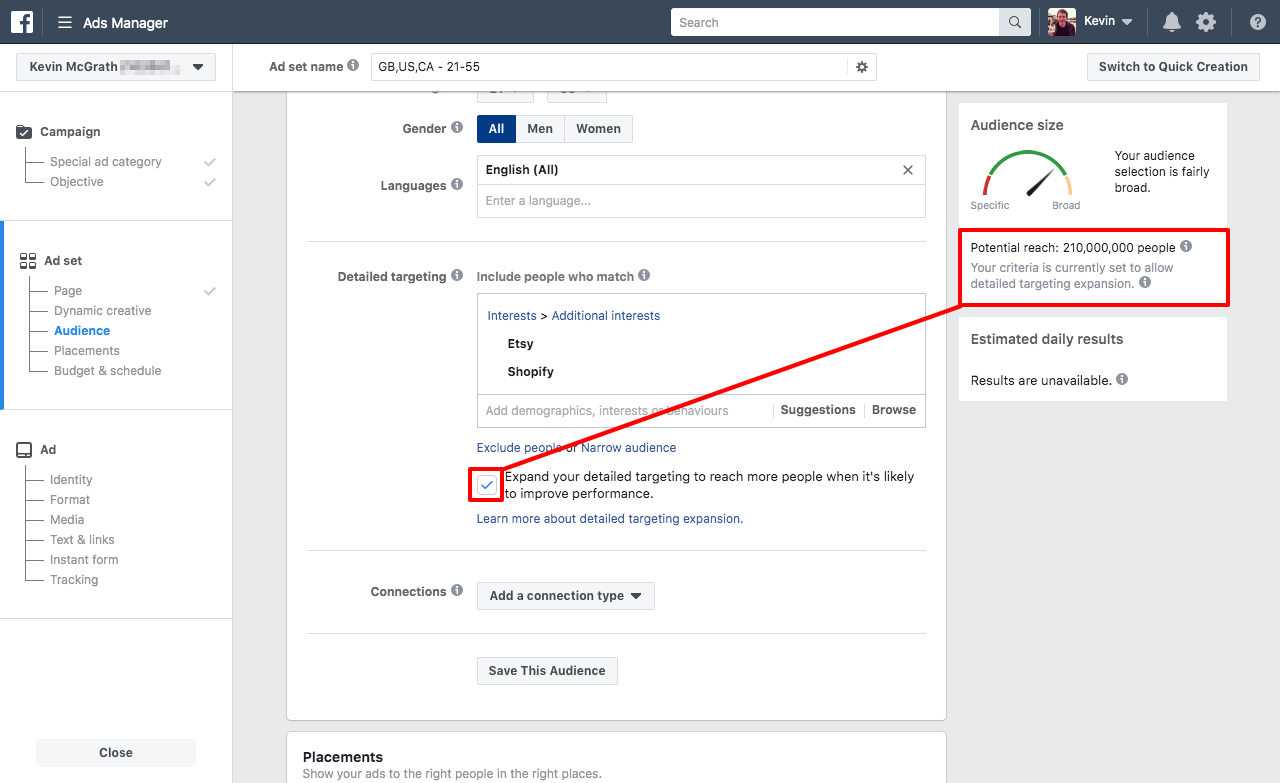
Below the 'detailed targeting' section you'll see a checkbox to expand your targeting. This can make a dramatic difference to the potential reach of your ad.
If you select this option then Facebook will add or remove interests to reach more people who may be interested in your ad but who weren't in your original targeting selection.
You can see in this example that our potential reach jumps from 35 million to 210 million when we select the expanded option. This is quite a large jump and since we can't see exactly what interests Facebook has added we can't be 100% sure that the audience is as accurate as it was originally. For this reason I would recommend leaving the expanded option unselected to start with. If your ad is not getting the amount of views after a certain period of time then you can come back and select this option to try and improve things.
Finally, we're going to save this audience so we can use it in future campaigns.
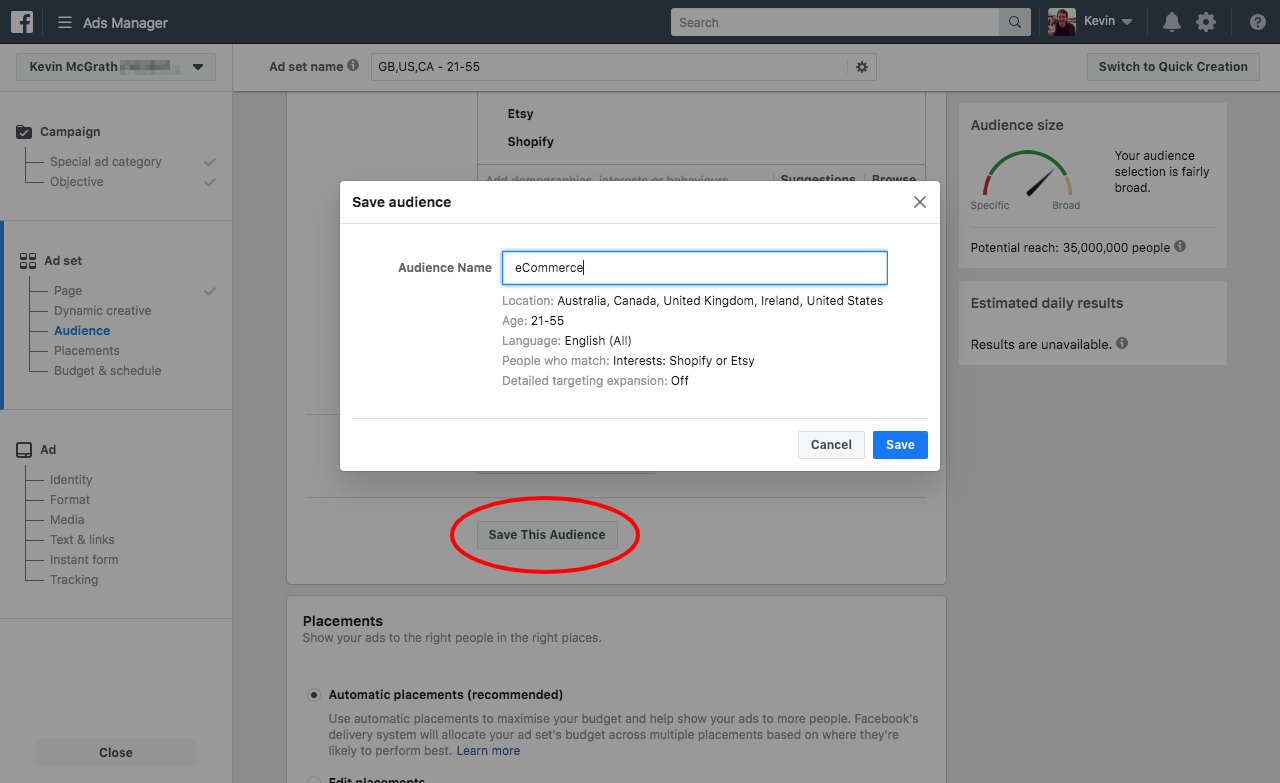
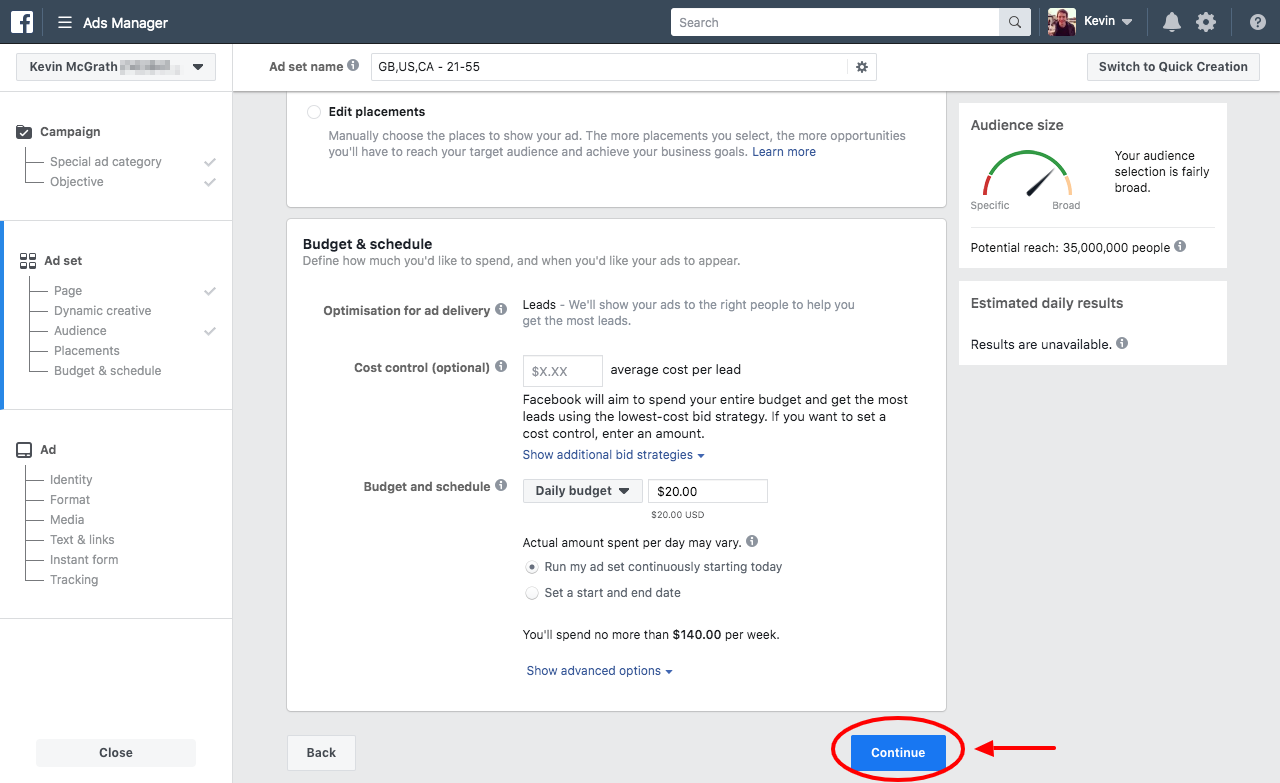
Once we click 'continue' we'll be able to customise what the ad actually looks like.
Customising Your Ad
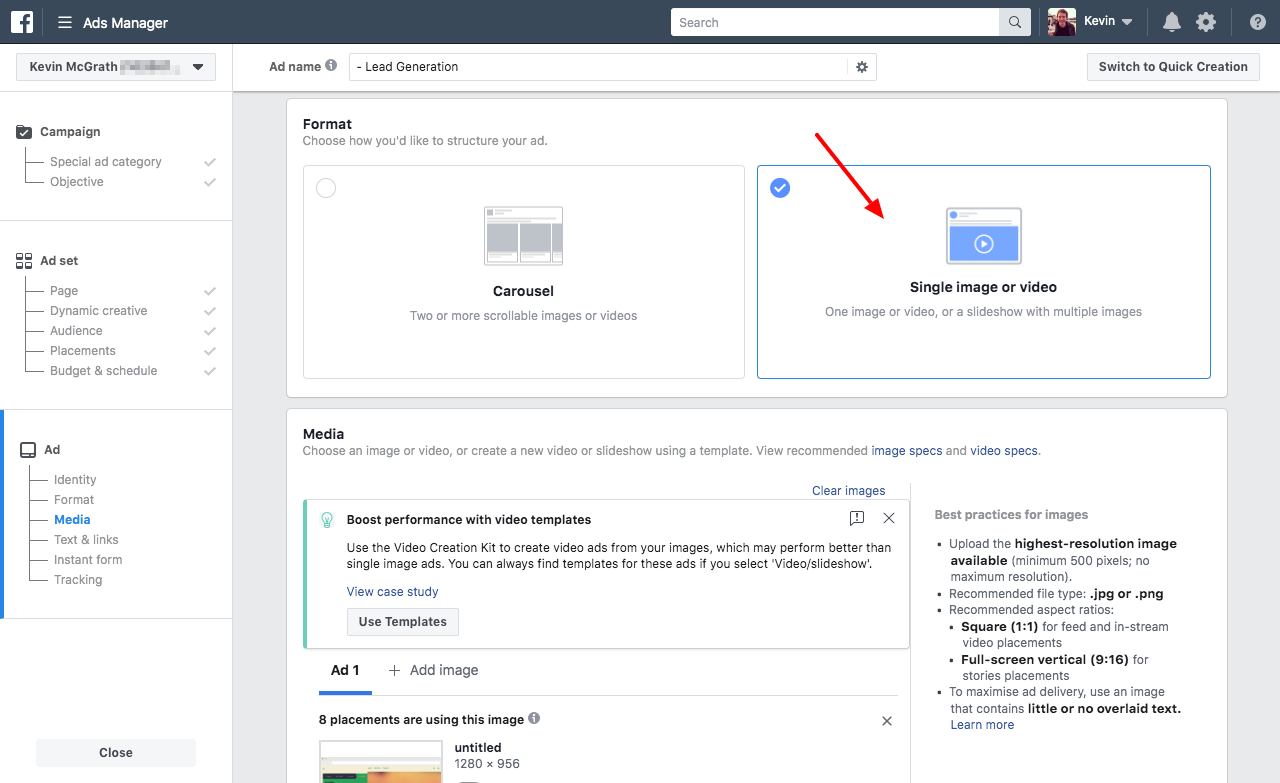
Since we're offering a lead magnet for download we won't need multiple images of our 'product' so for this reason we'll select the 'single image or video' option.
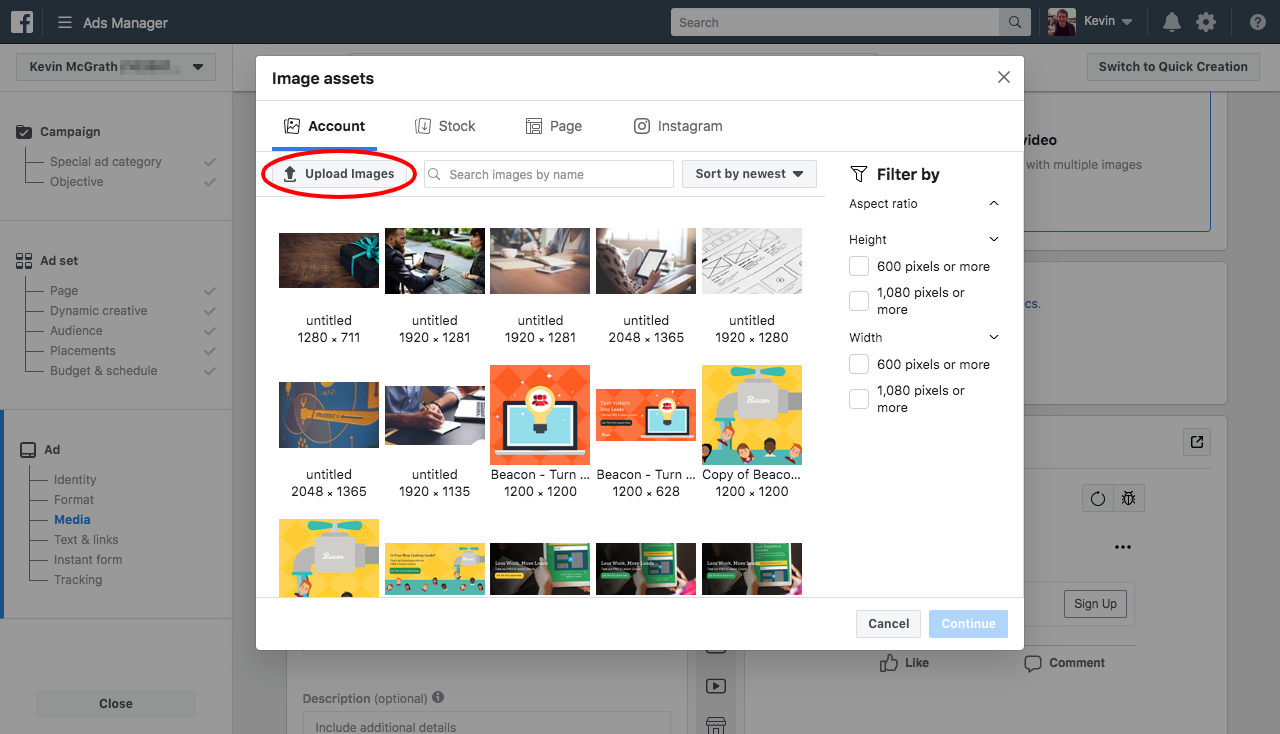
The image you select will play a big part in the success of your ad. The image should be both eye-catching and informative - i.e. it should give people an indication of what they will be downloading. The cover image of our lead magnet will be perfect.
Beacon will automatically generate a cover image for your lead magnet. Once you've downloaded that you can upload it to your Facebook account:

Now that the image is in place you can add the accompanying text for your advert.
The Primary Text is where the main description of your lead magnet should go. Be sure to focus on the benefits of your lead magnet - why should people care enough to download this thing? What's in it for them?
The Headline will appear in a slightly larger font in bold at the bottom of the ad so I like to add some strong call to action text here. Something like "download now" is perfect.
And for the description you'll want to describe exactly what it is that people will be downloading (obviously) - in this example it's 'free email templates'.
Next you can customise the 'call to action' button. There are multiple options like 'apply now' or 'sign up' but again I think it's best to be as informative as possible so 'download' is the most accurate in our situation.
You can see from the preview on the right-hand side that the first part of our ad is now shaping up nicely.
The next step is to customise what happens when someone clicks that 'download' button.
Customising The Lead Capture Form
Click the 'new form' button:
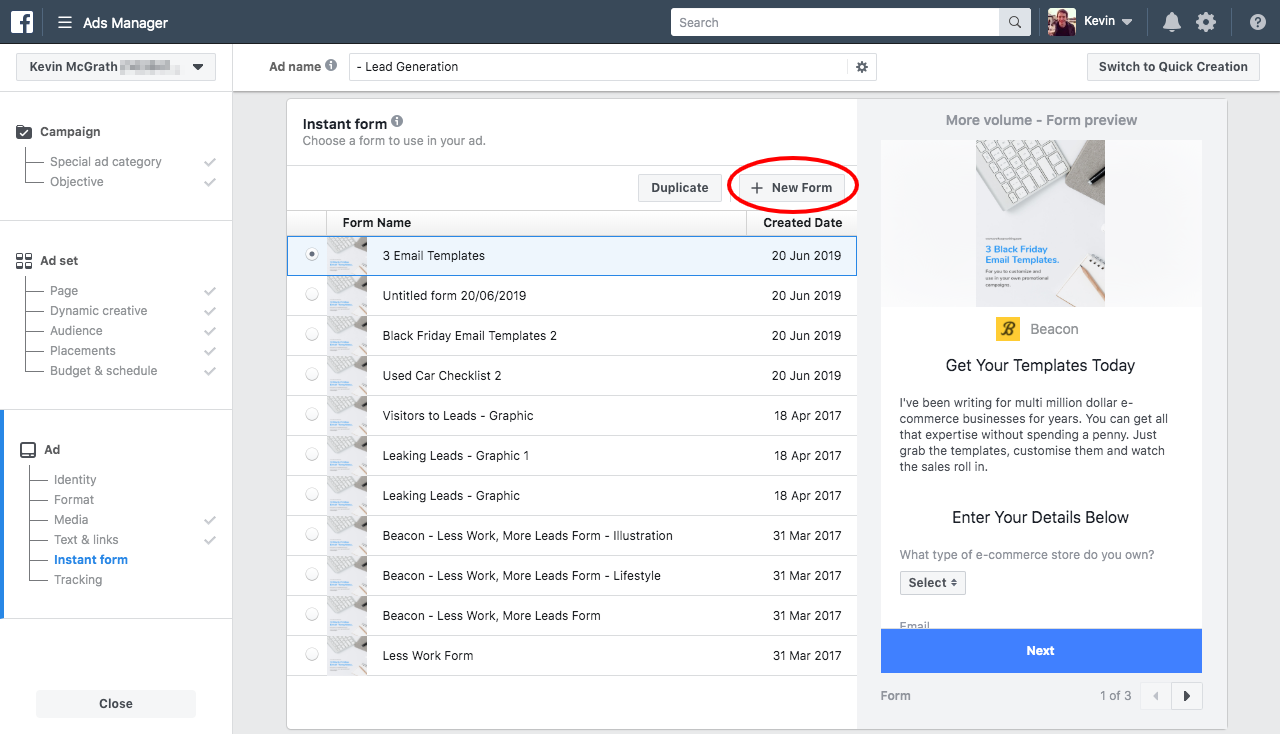
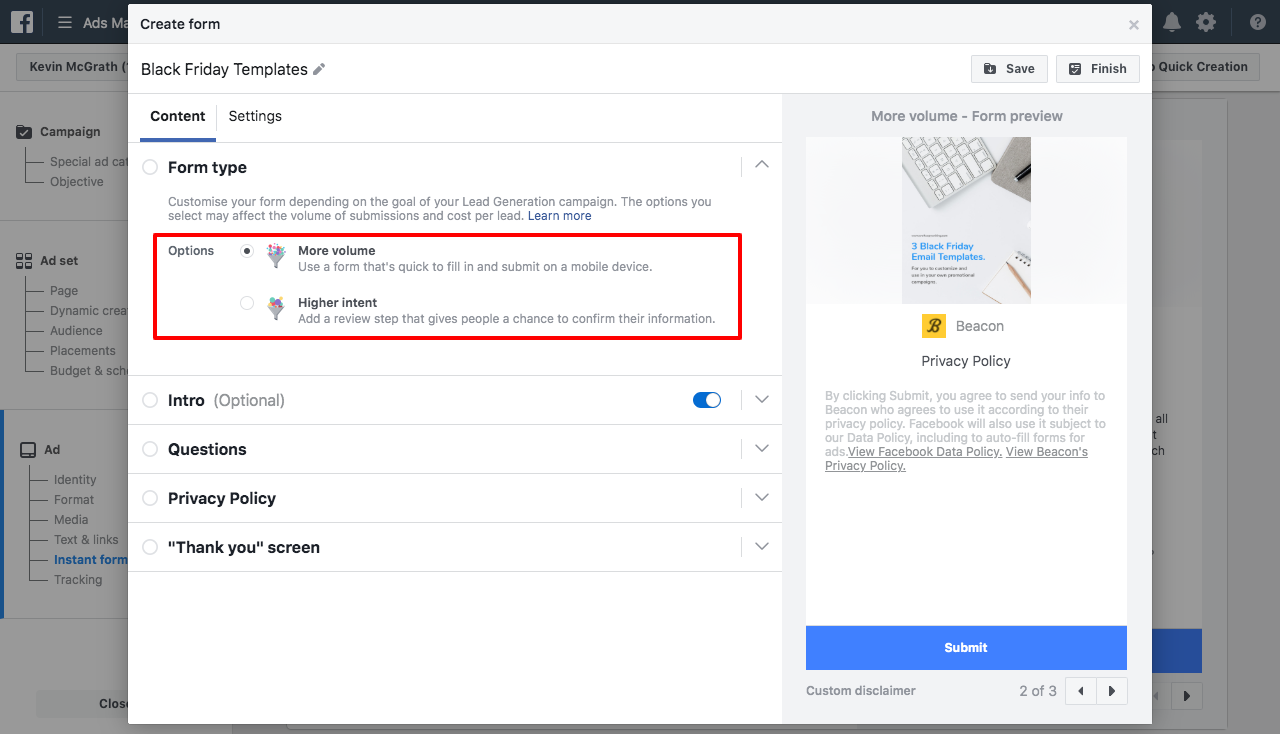
When choosing between the two options of form type I would recommend sticking with the default 'more volume'. As you can see from Facebook's own description this form type is more suitable for users on mobile devices which we know is the majority of Facebook users.
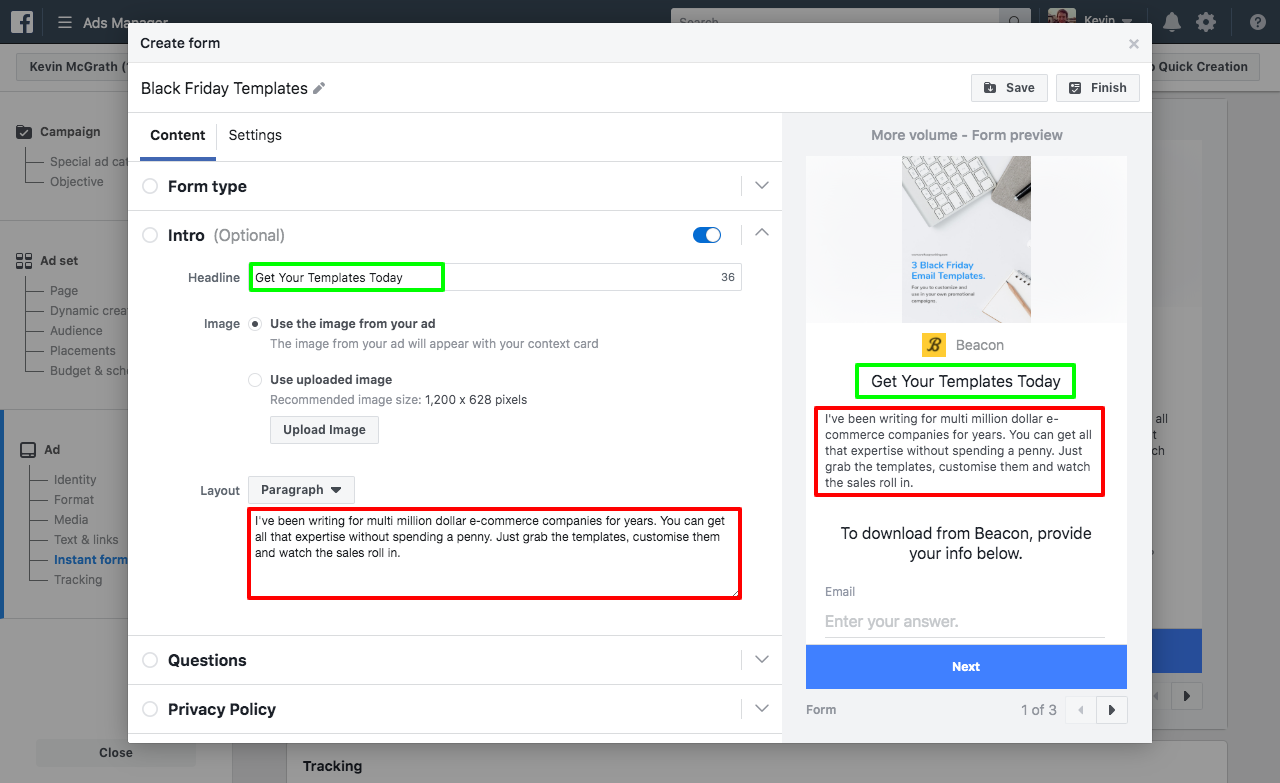
We now have the option to add some more text to our ad and this gives us opportunity to really convince people that this lead magnet is worth downloading.
As we know by now, the whole point of a lead magnet is to swap content for contact information. You now have the opportunity to customise what contact information you request from people.
Some of this information - like name, email etc - can be pulled in directly from the user's Facebook account so the form will be pre-populated.
You can stick with the default 'name and email' or you can add more form fields like 'job title'.
I would recommend only asking for the information that is absolutely necessary. That way people won't get spooked by handing over too much personal information.
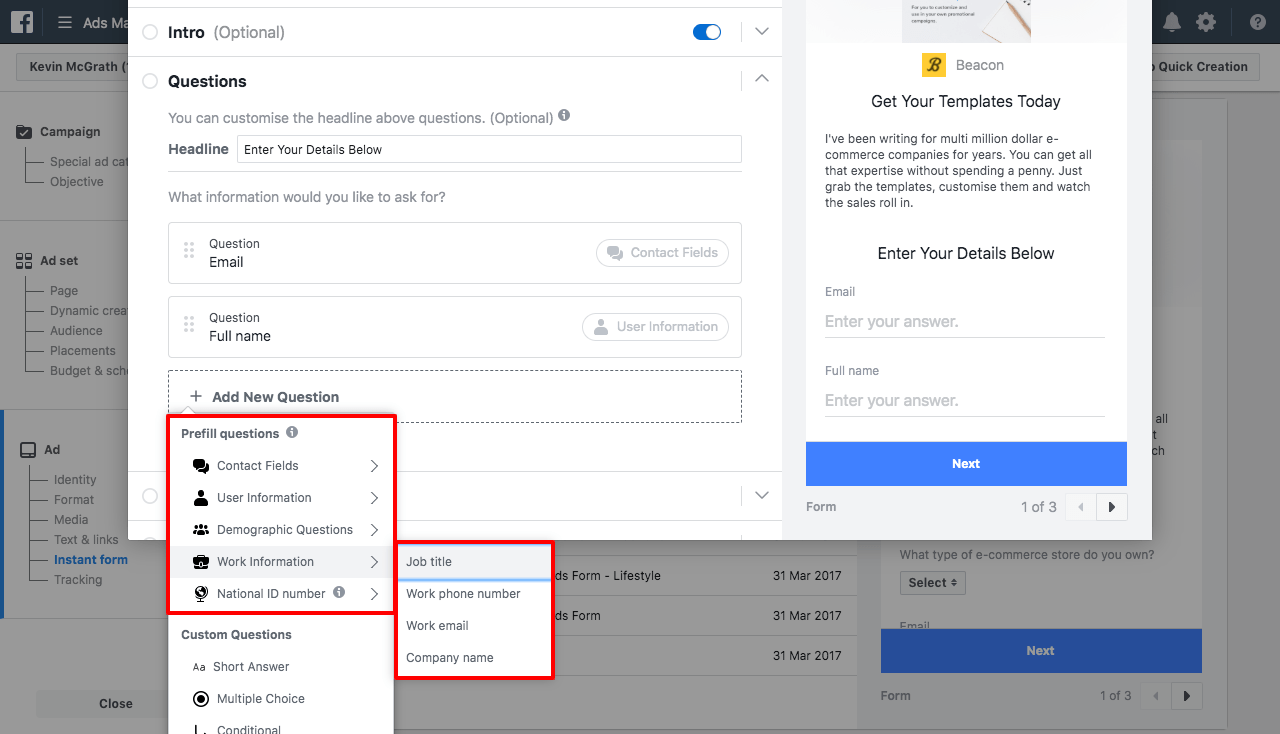
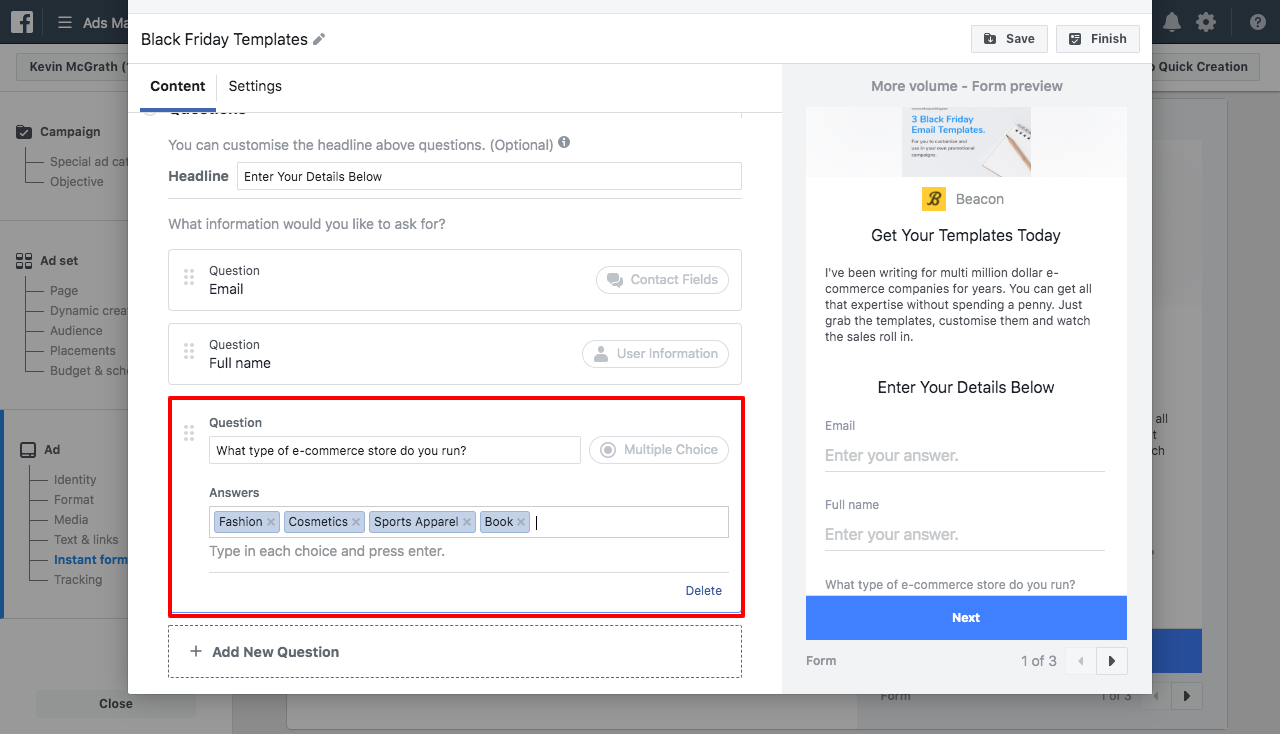
In this example we're going to ask for some more qualitative information so we can learn more about the people who are opting in to our form. In particular, I want to know what type of e-commerce store our readers operate.
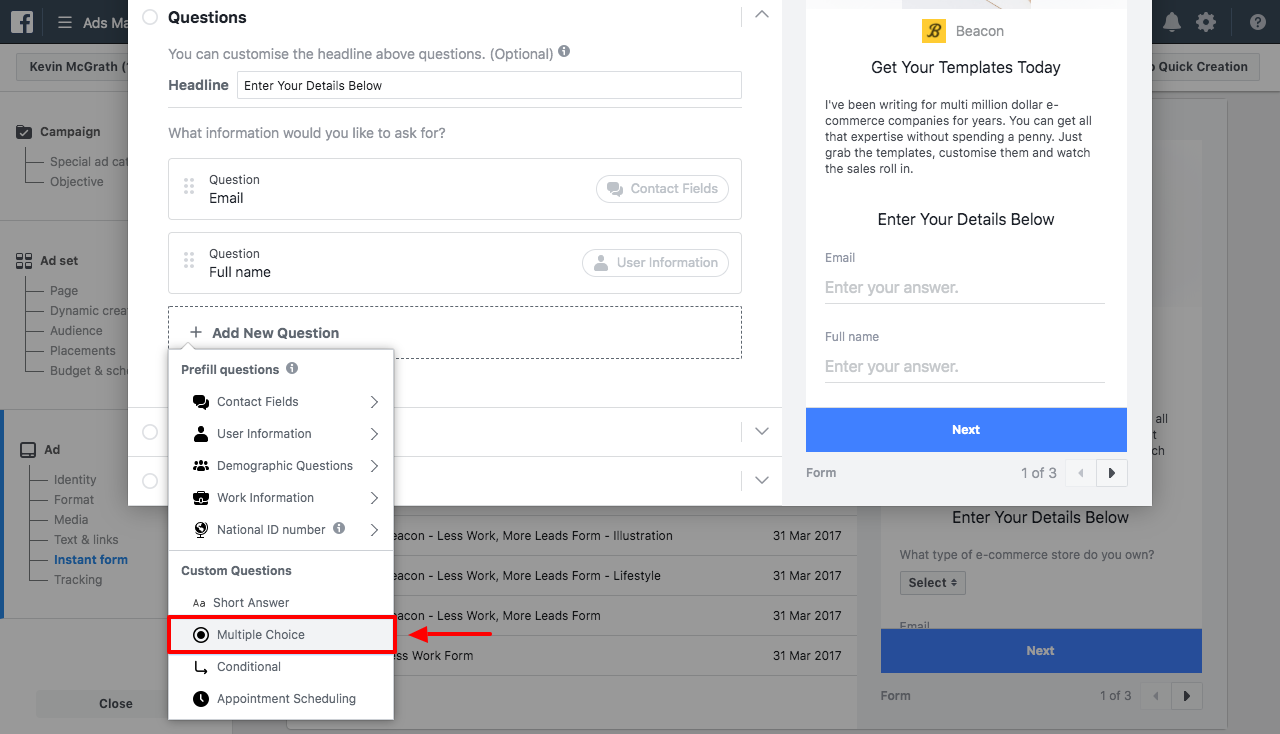
To do that I'm going to select 'multiple choice' from the 'add new question' menu.
And I'm going to pre-set the multiple choice options that people can choose from:
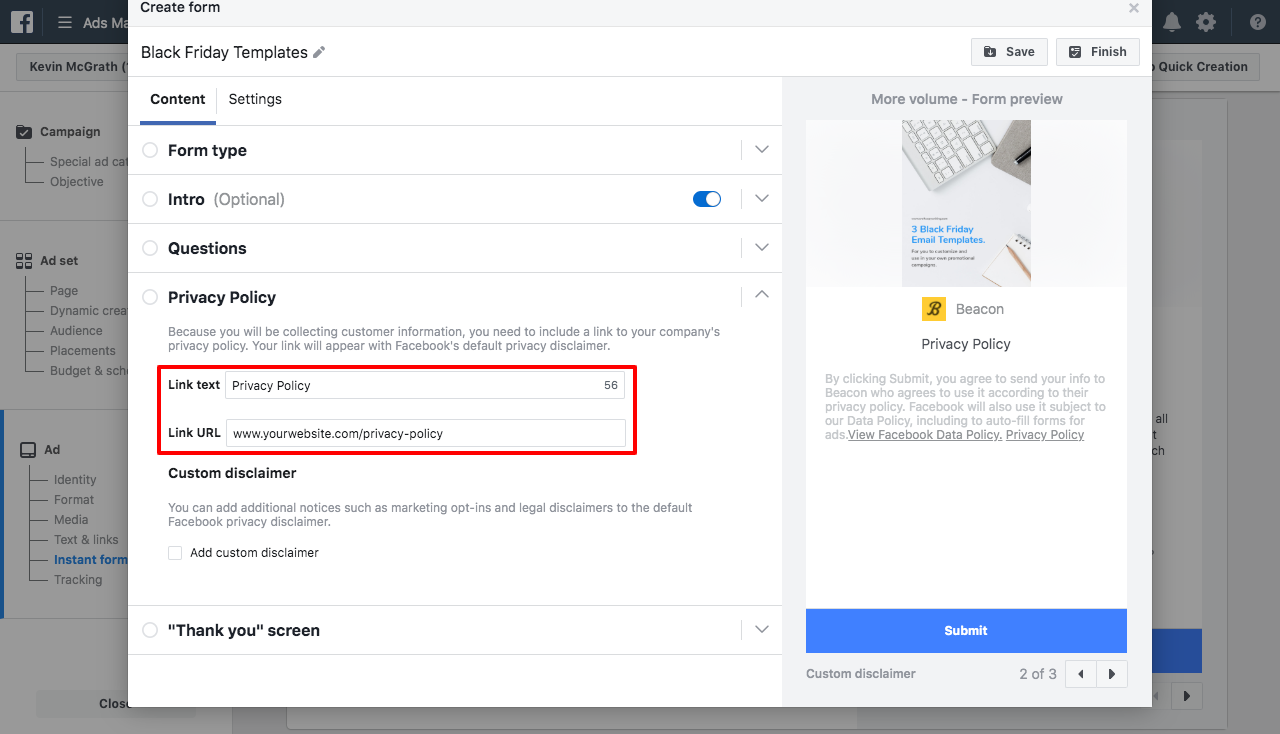
Since you're going to be collecting personal information Facebook will ask you to include a link to your privacy policy. If you don't already have a privacy policy then you can use a service like GetTerms.io to generate one.
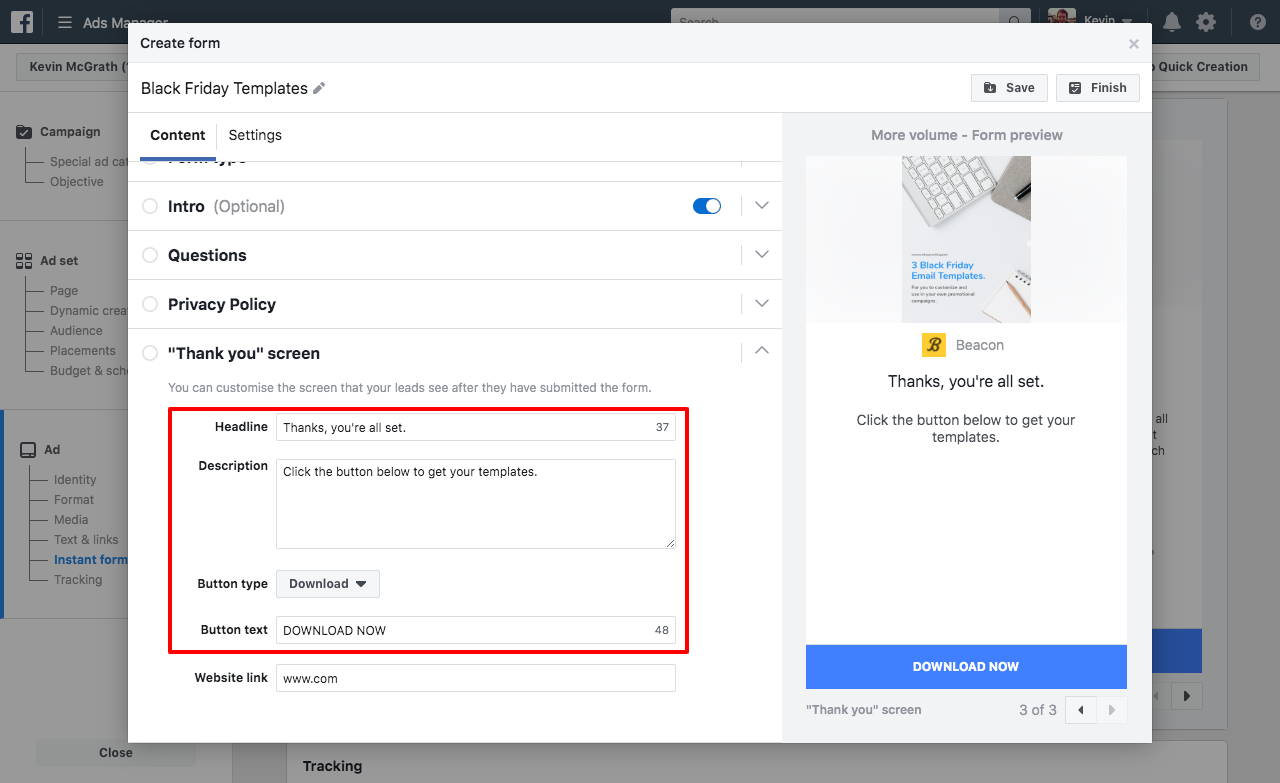
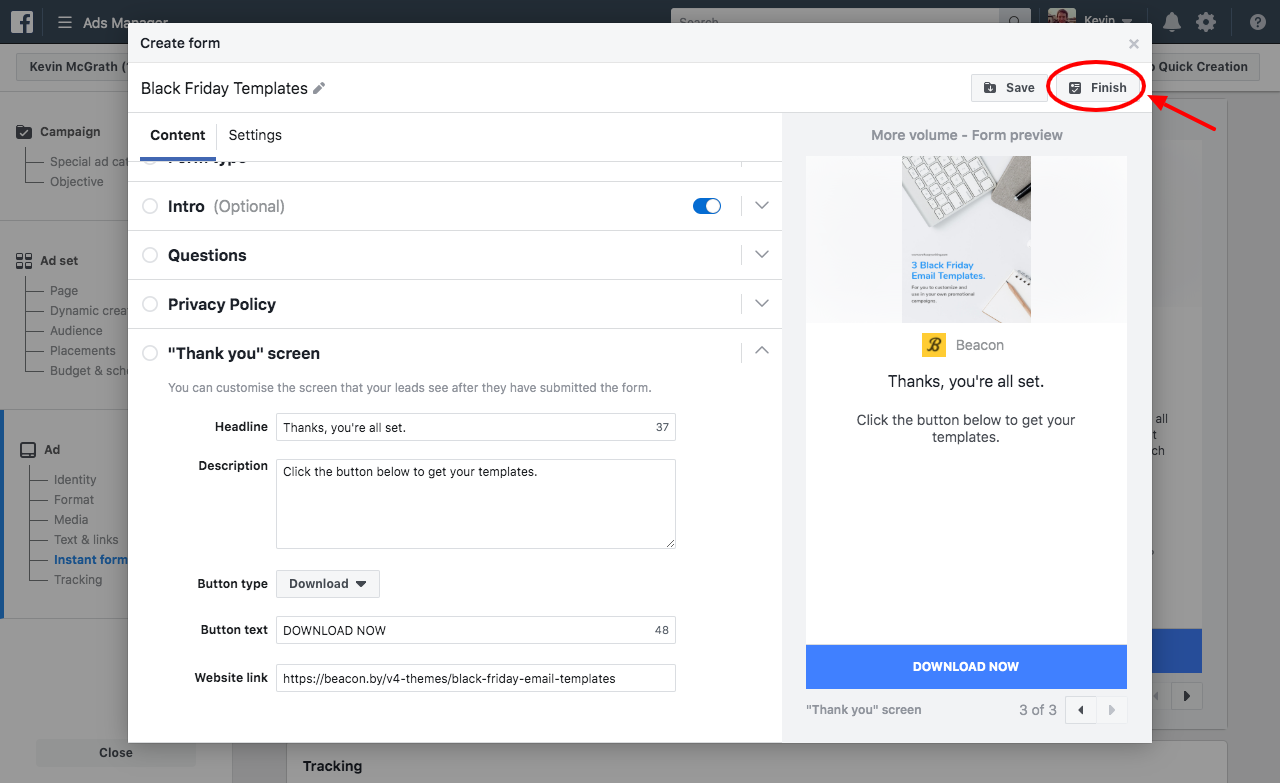
Finally, we're going to enter some information for the 'thank you' screen which appears when people submit the form.
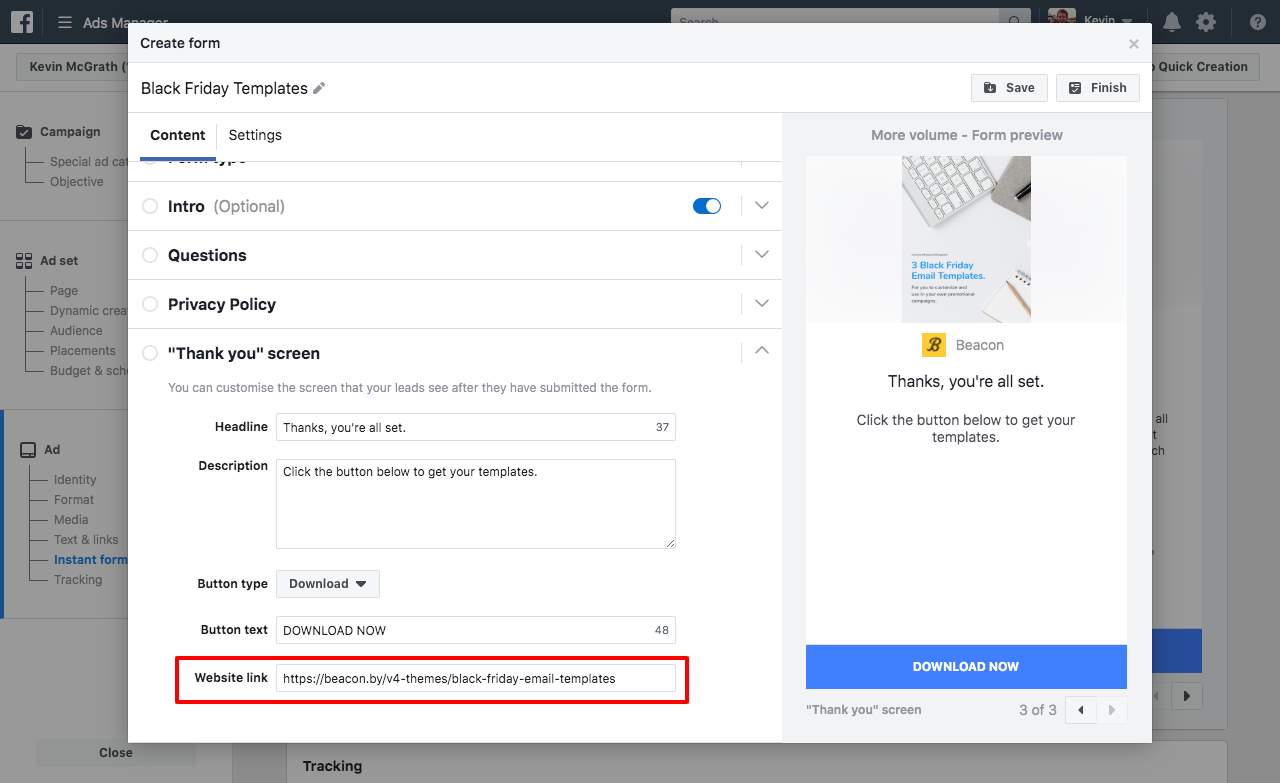
The most important field here is 'website link'. This is where we're going to put the URL for our lead magnet. If you're using Beacon to create your lead magnet then you should put the Smart PDF link here.
Remember that Smart PDFs are mobile optimised so if your Facebook users are browsing on a mobile device then they'll be able to read your lead magnet right away.
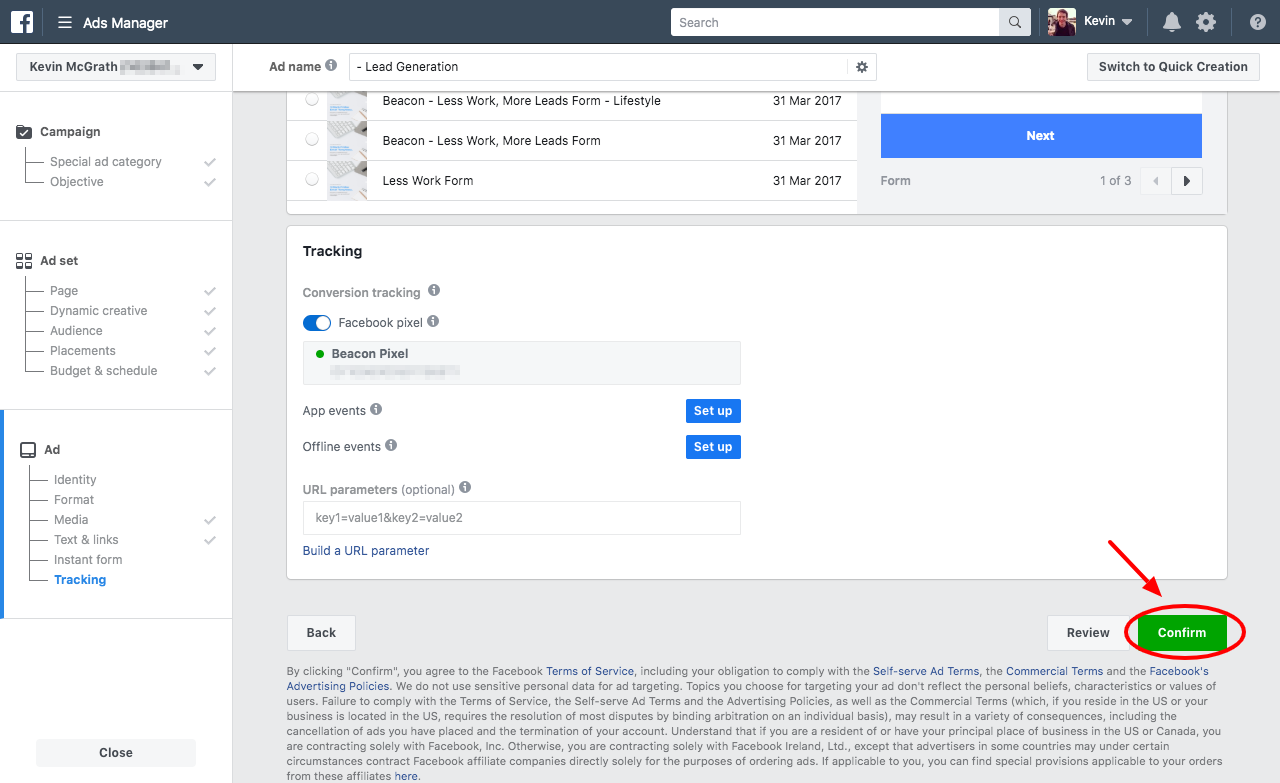
Lastly, just click the 'finish' button.
And then the confirm button.